Reblogged from CDM Create Digital Music
Open Source Video Editing from VLC Creators – QuickTime Pro Replacement?
Get VLMC
http://cdm.link/2010/01/vlmc-open-source-video-editing-from-vlc-creators/
https://code.videolan.org/videolan/vlmc
Now, the VLC folks are readying a companion to their player called VLMC. It’s in a very early state, but it could be the editor you’re missing. And VLMC is part of an all-out onslaught to finally bring open video to the masses. VLC is based on FFMPEG, which is not the most developer-friendly video framework (though it is very capable and fast).
07/04/2017


20/03/2017
How to Embed a PDF file in to a Blogger Blog using Google Drive
One of our readers requested us to
figure out how they can embed PDFs in their Blogger blog. There are many
ways through which we can embed PDFs or other documents like Microsoft
Word, Spreadsheets, PowerPoint Slides, and Excel Spreadsheets into our
Blogger Blog. However, Google Docs is probably the most authentic and
reliable way of embedding the PDF documents in a website. Therefore,
today in this article, we will show you How to Embed PDFs or any other
documents in Blogger Blog Posts.
First, go to https://drive.google.com
and Sign in into your Gmail or Google account so that you have the
admin privilege to the documents that would upload from your system hard
drive.
After signing in to your Google account, the next thing is to upload a
PDF file from your system hard drive. On pressing the upload icon from
the left side panel a drop down menu will pop out which would consist of
two options i.e. File and Folder. Just select “File” and head to the
next step.
How to fix Google Chrome Icon Missing From Taskbar (Windows 7 + 10)
Short description:
1. Start Google chrome
2. Right click new page icon on taskbar, locate Google Chrome from the bottom, right click and choose Properties
3. Click Change icon, you will receive Windows missing file message, close it.
4. Click browse and locate your Google Chrome installation folder
C:\Program Files\Google\Chrome\Application (Windows 7 32bit)
C:\Program Files (x86)\Google\Chrome\Application (Windows 7 64bit)
5. Choose Chrome.exe file and select the icon.
23/06/2016
Use iPhone or iPad as a Laptop Remote Control
As I am going to be giving a few Powerpoint presentation in the near future. I thought I would explore the possibility of using my iPhone and or iPad as a Bluetooth remote control for my Windows 10 Laptop. Following the usual Google browse I eventually decided on Unified Remote.
As is often the case with app's there is a FREE and a paid for version. I tried the FREE version first and after adding the Slide Show Remote option to the selection of Remotes, I found it worked extremely well. There are a set of default Remote options and a selection of additional FREE ones to add and of course a range of PAID for Remotes as well.
You need to install the App on both Laptop or PC and your iPhone or iPad, which was painless in both cases. It will work with both WiFi and Bluetooth but I have only tested it with Bluetooth.
The most irritating bit was getting my iPad and my Laptop to talk to each other, but turned out I was not following the correct procedure!
Checkout the website here
As is often the case with app's there is a FREE and a paid for version. I tried the FREE version first and after adding the Slide Show Remote option to the selection of Remotes, I found it worked extremely well. There are a set of default Remote options and a selection of additional FREE ones to add and of course a range of PAID for Remotes as well.
You need to install the App on both Laptop or PC and your iPhone or iPad, which was painless in both cases. It will work with both WiFi and Bluetooth but I have only tested it with Bluetooth.
The most irritating bit was getting my iPad and my Laptop to talk to each other, but turned out I was not following the correct procedure!
Checkout the website here
16/03/2016
Misquoting a Quote
Reposted from DILBERT by Scott Adams - The Famous Quote I Never Said
The strap line on the header for this blog uses the quotation:
“Creativity is allowing yourself to make mistakes. Art is knowing which ones to keep.”
it is attributed it to Scott Adams and is one of his Dilbert Principles.
I recently came across a blog post by Scott Adams in which he reports how his quote has been appropriated and misquoted, being corrupted to read:
“Creativity is allowing yourself to make mistakes. Design is knowing which ones to keep.”
The blog article reads - You’ll see lots of versions of that quote floating around the Internet too (see a few in the image above), but many of the newer ones have been altered from “art” to “design.”
My problem with the altered quote (aside from creating a misleading history) is that design is largely rules-based. Art is not, or at least not so much. When I hire a designer, I want someone who has the training and experience to know what will work for a particular commercial purpose. They should be thinking about how the message is delivered, how the human brain processes ideas, what part of the design has the button you want users to press, and so on.
That is pretty much the direct opposite of art. So putting design in that quote is an attempt to (elevate?) design to art, as if art is somehow more important.
Personally, I think good design that affects millions of people is more important than art than hangs in one room. But I’m not trying to pick a winner. All I’m saying is that the famous quote about design, mistakenly attributed to me, doesn’t make sense.
He suggests:
"Just remember that 98% of everything you read on the Internet is bullshit. The other 2% is accurate by accident."
You can misquote me on that - Scott Adam
I am pleased to note that I managed to use the quotation correctly...
I chose the quote because it encapsulates my ethos about art precisely and I agree with Scott the misquote means something quite different...
WARNING when I last tried to access Scot Adams website I received a Malware alert
The strap line on the header for this blog uses the quotation:
“Creativity is allowing yourself to make mistakes. Art is knowing which ones to keep.”
it is attributed it to Scott Adams and is one of his Dilbert Principles.
I recently came across a blog post by Scott Adams in which he reports how his quote has been appropriated and misquoted, being corrupted to read:
“Creativity is allowing yourself to make mistakes. Design is knowing which ones to keep.”
The blog article reads - You’ll see lots of versions of that quote floating around the Internet too (see a few in the image above), but many of the newer ones have been altered from “art” to “design.”
My problem with the altered quote (aside from creating a misleading history) is that design is largely rules-based. Art is not, or at least not so much. When I hire a designer, I want someone who has the training and experience to know what will work for a particular commercial purpose. They should be thinking about how the message is delivered, how the human brain processes ideas, what part of the design has the button you want users to press, and so on.
That is pretty much the direct opposite of art. So putting design in that quote is an attempt to (elevate?) design to art, as if art is somehow more important.
Personally, I think good design that affects millions of people is more important than art than hangs in one room. But I’m not trying to pick a winner. All I’m saying is that the famous quote about design, mistakenly attributed to me, doesn’t make sense.
He suggests:
"Just remember that 98% of everything you read on the Internet is bullshit. The other 2% is accurate by accident."
You can misquote me on that - Scott Adam
I am pleased to note that I managed to use the quotation correctly...
I chose the quote because it encapsulates my ethos about art precisely and I agree with Scott the misquote means something quite different...
WARNING when I last tried to access Scot Adams website I received a Malware alert
07/03/2016

01/03/2016
What is a Blog For - Remembering?
What do you do when you have an over active, creative mind? I have always been a very practical sort of a person and an autodidact to boot. Despite my advancing years, my mind is constantly churning over ideas about anything and everything. I have been into taking things apart from a very early age, it took a bit longer to start putting them back together again and making new stuff from scratch or junk or even new stuff. I am stimulated by all sorts of triggers, newspaper articles, stuff in my inbox, Pinterest, Instructables, pod-casts of all kinds. These sources are a cornucopia of ideas and a springboard for my rather over-fertile mind. No, that does not mean it is a compost heap or has dirty thoughts, well only occasionally. Although, mentioning compost heaps, does remind me of a great paper about the neuroscience of memory, where the compost heap is used as a metaphor for how memory works. See what I mean about one thing leading to another. Anyway, what is all this babble leading to?
Digi-Blog was started so that I had somewhere to park useful information, and some of the mad ideas I come across or think up. The Blog has proved to be a great way of keeping track of all this sort of stuff, so I can find it again. See we are back to memory, its a bit of a preoccupation with me. If you have a brows through the other posts you will find stuff about fixing, doing ,making and vaguely interesting, maybe sometime in the future. Get to the point - I have decided to start posting a lot more stuff about the the things that I find interesting, en passant but, which immediately disappear from my memory (sorry, I mentioned it again).
Current areas of interest are ceramics, particularly Raku. This morning my attention has been grabbed by casting clay in plaster moulds, slip moulding. I have looked up lots of info, I just need to store it somewhere until I need it. What better place than Digi-Blog. Of course In the process of browsing stuff about ceramics, other stuff attracts ones attention. I spotted an interesting piece about repairing ceramics. Rather than try for an invisible repair this technique emphasises the repair, a very Wabi Sabi thing to do. I have a quite valuable piece of ceramic that I treated myself to after I sold some artwork, unfortunately the window blind caught it on a windy day and it ended up in pieces. I have been going to repair it, and haven't, maybe this is the way to go.
So you can see my mind flips from one thing to another, very difficult to keep track of the interesting stuff. The Blog is one way to keep track of my volatile mind.
Digi-Blog was started so that I had somewhere to park useful information, and some of the mad ideas I come across or think up. The Blog has proved to be a great way of keeping track of all this sort of stuff, so I can find it again. See we are back to memory, its a bit of a preoccupation with me. If you have a brows through the other posts you will find stuff about fixing, doing ,making and vaguely interesting, maybe sometime in the future. Get to the point - I have decided to start posting a lot more stuff about the the things that I find interesting, en passant but, which immediately disappear from my memory (sorry, I mentioned it again).
Current areas of interest are ceramics, particularly Raku. This morning my attention has been grabbed by casting clay in plaster moulds, slip moulding. I have looked up lots of info, I just need to store it somewhere until I need it. What better place than Digi-Blog. Of course In the process of browsing stuff about ceramics, other stuff attracts ones attention. I spotted an interesting piece about repairing ceramics. Rather than try for an invisible repair this technique emphasises the repair, a very Wabi Sabi thing to do. I have a quite valuable piece of ceramic that I treated myself to after I sold some artwork, unfortunately the window blind caught it on a windy day and it ended up in pieces. I have been going to repair it, and haven't, maybe this is the way to go.
So you can see my mind flips from one thing to another, very difficult to keep track of the interesting stuff. The Blog is one way to keep track of my volatile mind.
23/02/2016
Samsung Smart TV does not play USB Video - Fix
I have a Samsung Smart TV Model UE22D5003 which I discovered to my disappointment would not play video from a USB Flash drive, only music and photos.
I am most grateful to a thread on AVForums for the fix:-
I am delighted to say it worked for me at the second try. I think you need to press the buttons fairly quickly for it to work.
Here are some shots of the set-up screen that opens when you follow the above instructions.


I am most grateful to a thread on AVForums for the fix:-
There is an easy solution to fix this problem:
-With the TV in STAND-BY Mode press the following keys in sequence in the remote: Info, Menu, Mute and Power on the TV.
- The TV shows the service menu, find the menu OPTION, press Enter> Factory Reset, scroll down to MODEL press Enter then Right or Left buttons to see the various model numbers until you get to UD5800. Press POWER button. See images below
And voilà! Yo can play videosTurn TV on, change Source to USB and you should now have a Video option
I am delighted to say it worked for me at the second try. I think you need to press the buttons fairly quickly for it to work.
Here are some shots of the set-up screen that opens when you follow the above instructions.

This is the first screen to appear
PRESS OK for Option

Scroll down till you get to Model

Use L and R buttons to search for UD5800
Press POWER button
01/11/2015
How to find Windows Product Key using Command Prompt
My Problem
Minor problem with upgrading to Windows 10 from Windows 8.1 on a new laptop. For reasons which I shall not bore you with the Microsoft account login details were thrown away. So at the moment the laptop is an expensive brick. As there is no data on the machine the plan is to reinstall Windows 10. The problem is; what is the product key for the Windows 8.1 OS, so that a free install can be made? I have successfully used the following Comand Prompt string to recover the key. Will a reinstall of Windows 10 solve the access problem?The following article is courtesy of The Windows Club.
How to find Windows Product Key using Command Prompt
When you enter, register and activate your copy of Windows, using a Retail key, the information is stored in the Windows Registry. Users of OEM computers may have noticed that, since a couple of years, the manufacturers have stopped pasting their COA or Certificate of Authenticity sticker, which displayed the Windows product key to the machine anymore. Now this key is embedded in the BIOS/UEFI.Find Windows Product Key
It is to be noted that a Retail product license is tied to the person whereas the OEM product key is tied to the machine, as per Microsoft Windows Desktop licensing terms. In this post, we will see how to find Windows Product Key using Command Prompt or PowerShell, from BIOS or Registry. It works for Retail & OEM licenses too.Recover Windows product key using Command Prompt

From the WinX Menu in Windows 10 / 8.1, open an elevated command prompt window, type the following command and hit Enter*:
wmic path softwarelicensingservice get OA3xOriginalProductKey
Your Windows product key will be displayed.
*NOTE: the "O" in OA3 is capital letter O and not a zero 0
Source link
24/10/2015
Microsoft Word Problem with Unexpected Page Breaks
I have been having an irritating formatting problem in Microsoft Word 365, but I think you can get the same problem in all versions of Word. The problem was after a sub-heading the following text would start on a new page. After much fiddling with Style settings and trying various fixes unsuccessfully, I eventually came across the fix that I have reproduced in full below on the Microsoft support website.
It is counter intuitive, typical Microsoft, as you will see it involves removing the "Keep with next" option from the Normal Style, Paragraph format Menu.
Check for unexpected page breaks following "Normal" style text
If a series of Heading styles is used in a document (an outline, for example) followed by text that is formatted with the Normal style, an unexpected page break may occur following the Normal text. This problem occurs only in normal view and does not occur in outline view. Use one of the following methods to remove individual occurrences of an unwanted page break.Method 1: Apply the "Keep with Next" option to Normal text
Word 2000, Word 2002, and Word 2003
- Select the Normal text.
- On the Format menu, click Paragraph.
- Click the Line and Page Breaks tab, and then click to select Keep with next.
- Click OK.
Word 2007, Word 2010, and Word 2013
- Select the Normal text.
- On the Page Layout tab, click the Paragraph dialog box launcher in the Paragraph group.
- Click the Line and Page Breaks tab, and then click to select Keep with next.
- Click OK.
Method 2: Clear the "Keep with next" option from the heading
Word 2000, Word 2002, and Word 2003
- Select the Heading text that precedes the Normal text.
- On the Format menu, click Paragraph.
- Click the Line and Page Breaks tab, and then click to clear the Keep with next check box.
- Click OK.
Word 2007, Word 2010, and Word 2013
- Select the Heading text that precedes the Normal text.
- On the Page Layout tab, click the Paragraph dialog box launcher in the Paragraph group.
- Click the Line and Page Breaks tab, and then click to clear the Keep with next check box.
- Click OK.
Method 3: Permanently change the occurrence of unwanted page breaks
Word 2000, Word 2002, and Word 2003
- On the Format menu, click Style.
- In the List list box, click All styles.
- In the Styles list, click Heading 1.
- Click Modify.
- Click Format, and then click Paragraph.
- Click the Line and Page Breaks tab.
- Click to clear the Keep with next check box, and then click OK.
- To make the change permanent for the current document and all new documents based on the active template, click to select Add to template. Otherwise, the changes that you make will only affect the current document.
- Click OK, and then click Close.
Word 2007, Word 2010, and Word 2013
- On the Home tab, go to the Styles group, and then click the Styles dialog box launcher to open the list of styles.
- In the Styles list, click Heading 1.
- Click Modify.
- Click Format, and then click Paragraph.
- Click the Line and Page Breaks tab.
- Click to clear the Keep with next check box, and then click OK.
- To make the change permanent for the current document and all new documents based on the active template, click to select New document based on this template. Otherwise, the changes that you make will only affect the current document.
- Click OK, and then click Close.
12/10/2015
Use Microsoft Word as a Barcode Generator
Re-posted from Online Tech Tips
A very comprehensive article about how to generate barcodes in Microsoft Word. The article also contains a considerable amount of info about barcodes in general and a free barcode generator.
Link: http://www.online-tech-tips.com/computer-tips/free-barcode-generator/
Did you know that you can use Microsoft Word to create your own barcodes? Creating your own barcodes is actually kind of cool and pretty easy to do. Once you have a barcode, you can stick it onto anything you want and then scan them using a physical barcode scanner or with your smartphone by downloading an app.
There are several different types of barcodes and I’ll try to show you how to create as many of them as possible for free. In order to create certain types of barcodes, you need specialized commercial software, so I won’t mention those. The most common 1D barcodes are Code 39, Code 128, UPC-A, UPC-E, EAN-8, EAN-13, etc. 2D barcodes include DataMatrix, PDF 417 and QR codes.
More...
A very comprehensive article about how to generate barcodes in Microsoft Word. The article also contains a considerable amount of info about barcodes in general and a free barcode generator.
Link: http://www.online-tech-tips.com/computer-tips/free-barcode-generator/
Did you know that you can use Microsoft Word to create your own barcodes? Creating your own barcodes is actually kind of cool and pretty easy to do. Once you have a barcode, you can stick it onto anything you want and then scan them using a physical barcode scanner or with your smartphone by downloading an app.
There are several different types of barcodes and I’ll try to show you how to create as many of them as possible for free. In order to create certain types of barcodes, you need specialized commercial software, so I won’t mention those. The most common 1D barcodes are Code 39, Code 128, UPC-A, UPC-E, EAN-8, EAN-13, etc. 2D barcodes include DataMatrix, PDF 417 and QR codes.
More...
04/09/2015
Dual Monitors in Windows 7 - Quick Fix
I disconnected one of my monitors, don't ask why, when I reconnected it the display was not active. Could I remember how to get both monitors working? Anyway a quick google reminded me that all you have to do is press the Win and P keys to show the appropriate dialogue box. Select the "Extended" option and Bingo, two monitors working again.
For more information follow the link to the Microsoft Support page.

For more information follow the link to the Microsoft Support page.

11/08/2015
Remove White Text Background in a Blogger Post
Re-blogged from Tech News
I have had the problem of text on a white background with a number of my blog posts particularly when cutting an pasting text from Word or other locations, which is a pain, as my background is black. Here is a solution...
Remove White text Background in Blogger Post
I have had the problem of text on a white background with a number of my blog posts particularly when cutting an pasting text from Word or other locations, which is a pain, as my background is black. Here is a solution...
Remove White text Background in Blogger Post
Sometimes when you compose a post and copy some material from other web sites or even from Office Word the white background is copied along with the text as background. Due to this the background of post appears white. So how to get rid of this annoying white background in blogger posts. But before i tell you the solution to avoid such problems in future you can compose your text in Notebook and then copy it rather than using Office.Ok now to remove white background of already posted text follow these steps.
1.Go to edit your post
2.There you will find two options on upper left corner Compose and HTML
3.Click HTML
4. Now press control F and search for <span style="background-color: white;">
5.Delete style="background-color: white;"
6. So it turns to be <span>only and save

7. Also find style="background-color: white;
8. Delete the yellow highlighted portion that is background-color: white;
9. Now Save
10. Although it is a little bit time consuming as you will find a number of above mentioned two statements depending upon the length of your POST. However it is effective
Important
what if you have a lot of background-color: white; statements in HTML
What you can do as a shortcut is to cut all the HTML code paste it in the word e.g MS word 2007.Now click the replace button on the right hand corner

A find and replace window will pop out
In Find what copy and paste background-color: white;
and leave the Replace with blank and click replace all.This action will remove all the background-color: white; statements from your HTML code.Now copy all the HTML code from MS word and paste it back in your blogger post in HTML.Now check your post in compose. Click update check your post now.all the white background must have disappeared.
09/08/2015
Windows 7 Fails to Start - Error Code: 0xc000000e

Screen Clip
I came home from a weekend away to discover that my PC had rebooted and the screen showed the above message, presumably after a Windows Update. The options were to Escape or Continue.
I tried to Escape and ended back here. I inserted my Rescue Disc, which had worked on a similar occasion. The boot screen appeared but when I hit return I ended up back here. I tried the Windows 7 Disc with the same results. I Googled the problem, most of the advice led me down the same road, with no resolution of the problem. I tried turning off and back on using the button of the front panel, sill no luck.
In desperation I turned off the computer using the On/Off switch on the power supply unit on the back of the computer. I left it for a bout 3 minutes and then turned it back on. Magic it Re-Booted and started normally.
Now't so weird as computers...
01/08/2015
Rapid Resizer Useful On-line Tools for Creating Stencils and Resizing Drawings
Learn How to Print Patterns Exactly to Any Size
http://online.rapidresizer.com/
Make printable alphabet, letter, and number stencils. Great for painting, quilting, wood working, stained glass patterns, and other arts & crafts. Or make a stencil from a picture.
Automatically trace photos and pictures into a stencil, pattern, line drawing, or sketch. Great for painting, wood working, stained glass, or other craft designs.
http://online.rapidresizer.com/make-name-patterns.php
http://online.rapidresizer.com/photograph-to-pattern.php
http://online.rapidresizer.com/
Make printable alphabet, letter, and number stencils. Great for painting, quilting, wood working, stained glass patterns, and other arts & crafts. Or make a stencil from a picture.
Automatically trace photos and pictures into a stencil, pattern, line drawing, or sketch. Great for painting, wood working, stained glass, or other craft designs.
http://online.rapidresizer.com/make-name-patterns.php
http://online.rapidresizer.com/photograph-to-pattern.php
13/06/2015
How to Rotate a Video using VLC Media Player
This is a short tutorial on how to rotate and save a video using VLC Media Player Ver 2.1.2).
Check out this YouTube link
The full instructions can be found here: http://www.wintips.org/rotate-video-using-vlc-media-player-version-2-1-2/
VLC Version 2.1.2 official download links:
Source: http://www.wintips.org/
Check out this YouTube link
The full instructions can be found here: http://www.wintips.org/rotate-video-using-vlc-media-player-version-2-1-2/
VLC Version 2.1.2 official download links:
- For Windows 32bit versions:
http://download.videolan.org/pub/videolan/vlc/2.1.2/win32/vlc-2.1.2-win32.exe - For Windows 64bit versions:
http://download.videolan.org/pub/videolan/vlc/2.1.2/win64/vlc-2.1.2-win64.exe
Source: http://www.wintips.org/
07/06/2015
Make a Lo-Cost Ozone Generator - UPDATED
I was looking for simple instructions for building an Ozone Generator for use as s de-odorizer and came across this Instructable from Big Clive. Check out the site there are loads of other interesting things to make.
MAKE A $20 OZONE GENERATOR.
Need some cheap ozone? Here's an experimental ozone generator based on readily available parts that you can build cheaply to clean up the air in your surroundings or get rid of strong odours. I think the latter will appeal to the people who grow exotic herbs in their homes, or live in damp climates where mould is a problem.
This project generally works well, but it's output depends on the components used. It's also very much a bare-bones experimental device so you build it entirely at your own risk.

This project generates ozone using corona discharge. This involves generating a high voltage electrical discharge and then blowing air past it. As the air passes through the corona the oxygen molecules are temporarily separated into individual oxygen atoms and when clear of the corona they start to recombine back into oxygen (O2) and ozone (O3). Since ozone is unstable it will readily donate the extra atom of oxygen to anything that will take it, and this results in a strong oxidising effect which can destroy odours and kill airborne viruses and mould.
Ozone has a very short lifetime, typically reverting back to oxygen again within an hour.

The most efficient way of creating ozone is with corona discharge. To create a controlled corona discharge you place an insulator between two high voltage electrodes. Without the insulator the current will arc between the electrodes and generate some ozone but also produce a lot of heat. With the insulator in place the current can't arc directly across and instead a charge is transferred back and forth in the style of a capacitor with the charge manifesting itself as a purple corona discharge. This requires the use of AC and you can get more corona in a smaller area using high frequency AC

A very common method of producing corona in a very compact form is the use of a corona plate. This is a piece of thin ceramic or glass with an electrode on each side that mirrors the other side without any significant overlap. When a high voltage is applied across the electrodes a corona line forms at the points where the top and bottom electrodes would touch if the insulator was not in the way. This arrangement is extremely efficient since the insulator can be very thin and this allows use of a much lower voltage, typically one to two kilovolts per millimetre.
The insulating material must be able to stand up to the high voltage, corona discharge and ozone, so it is generally glass or ceramic with ceramic the most common choice. The electrodes must also be able to withstand the arduous corona and ozone environment and would ideally be stainless steel with aluminium also being fairly suitable.

This is an example of a typical manufactured corona plate. The bottom electrode is mirrored on the back so that there is minimal overlap, and the high voltage is connected to the plate by the same spring clips that hold it in place.

As you can see, the ceramic is very thin at less than a millimetre. One of the main benefits of ceramic plates is that they have a very high dielectric strength, which basically means they can handle a much higher voltage without arcing through.

This was the result of an experiment I did with a bit of very thin PCB laminate with copper electrodes etched on either side. It worked for several hours with the corona visibly destroying the resin that bonds the glass fibre together, until it suddenly arced through. When a plate fails the current will all tend to arc through in one small point and cause a lot of heat in that area.

In my search for suitably thin insulating material to make cheap corona plates from I completely failed to find thin ceramic sheet at anything near an affordable price. Instead I found that glass microscope slides are pretty good with a thickness of about 1mm. I also tried large slide covers that were a very fragile .2mm thick, but they were very hard to apply the electrodes to without breaking them, and also failed electrically at about 2kV.

There are a few electrode arrangements you can make that determine the number of corona lines and thus the corona output, although that will also be determined by the output current capability of your high voltage supply.
I've shown two electrode arrangements, with yellow tape representing the bottom electrode and blue representing the top one. I'll mention again that there should not be excessive overlap, since any overlap will just pass AC current like a capacitor without producing any corona.
In the above designs the two part version produces two lines of corona (one top and one bottom) while the three part electrode arrangement produces four lines of corona. Try the simple two electrode version first though, since it's much easier to make.

I used self adhesive aluminium foil for my prototype. I started by applying a piece over half the glass plate as shown above.

I then used a sharp knife to cut and peel the ends away from either side so that there was no risk of arcing around the side of the glass if the electrodes were too close to the edge.

Then I used the knife to trim away the excess foil by slicing it against the glass. (Quite a satisfying slicing action I should add.)

Then I put an identical electrode on the other side making sure to align the edges on either side accurately without too much overlap.

Aluminium is extremely hard to bond wires to, so I simply stripped some thin stranded wires and formed loops.

Then stuck them onto the electrodes with more aluminium tape. this should be fairly reliable, since the current is very low.

The easiest source of a modestly high voltage supply was from a cold cathode kit as sold for modding PC cases. I got mine from an online site called ebuyer in the UK, and it came with two rather neat 12" (300mm) blue cold cathode tubes.

Most of these 12V cold cathode supplies are very similar inside. They have a simple push-pull transformer driver with feedback windings, and a high voltage output that is usually divided into two outputs using high voltage series capacitors which also serve to limit the current through each tube.

I cut the two output capacitors off since they interfered with the operation.

And connected my home built corona plate directly across the output of the high voltage transformer.

When powered up, a thin line of purple corona should appear on both sides where the electrodes meet. If it's just a few patches of corona then you could try boosting the supply voltage up from 12V to 14V, although going higher may risk causing the high voltage transformer to fail internally. These little power supplies are not designed for open circuit operation like this, so don't push them too hard.
At this point you should be smelling ozone as a fresh smell a bit like chlorine bleach (also a strong oxidiser).
And here's the finished unit. It uses a standard 12V case fan to push air across the corona and mix the resulting ozone into the rooms air. The corona plate is attached to the fan with two bits of binding strip normally used to hold documents together. I put a blank glass plate in it to align the two bits, then glued them to the fan with resin. (Cheers to Adam Aglionby for the mounting suggestion.) A proper mounting clip would have been nice, particularly one that also made the connections onto the plate.
I powered the whole assembly from an ordinary linear plug-in power supply which was rated at 12V 500mA. I deliberately used an unregulated supply running at less than full load to try and nudge the output voltage up a bit for a better corona.
It works well and soon makes a strong smell of ozone permeate my large flat which means there's actually too much ozone being generated for an occupied area. The output can be tamed down if you reduce the voltage a bit. You should be able to guage ozone output by looking at the corona in a dark room. For low levels it may even just be a few small patches here and there on the plate.
Alternatively you can run the unit on a time switch to cycle it on and off at various points throughout the day.

I added a 100 ohm 1W resistor in series with the fan I used to make it run quieter at the expense of airflow. This is only needed if you want to use the assembly in a quiet area where the whoosh of the fan could cause annoyance.
Although this unit uses high voltage it is at low current and high frequency, so if you should make contact with the high voltage side it is not really dangerous. Do keep in mind that if anything goes wrong then the high voltage could arc and cause sustained smouldering of whatever failed. As such, make sure that the unit is not used near anything flammable.
WARNING: Ozone is toxic and some people are allergic to it. If you can smell Ozone the concentration is potentially toxic. Only use in a well ventilated area and only run for a short time. For permanent use consider using a timer. Do your research. Further info.
UPDATE
Provisionally I have purchase 2 Hug Flight Air Purifiers from Amazon - link
18/05/2015
Run Out of Space on your SSD - How to Up-size a Solid State Hard Drive
For months I have been receiving a warning of low disc space on my C Drive. The 120GB OCZ SSD (Solid State Drive) I installed a couple of years ago certainly improved the performance of my Desktop PC, but 120GB is not much space even when you only use it for the main OS and the other stuff that is best run from the Root.
The plan was to replace the existing OCZ Vertex 3 120GB SSD with an OCZ Vector 180GB SSD. I had tried cloning the disc while installed in the PC but I could not get the Free Acronis software supplied with the replacement SSD to install so I decided to use a Freecom Hard Drive Dock Duplicator...
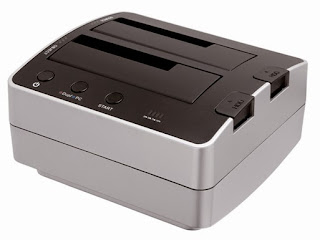
The beauty of this piece of kit is, it does not have to be connected to a computer and you do not need any software to clone a disc. WARNING always backup your data before paying around with a HDD. See my comment at the end of this post.
Carefully remove the drive you want to clone from your computer, beware of static, ground yourself before starting. Make sure the Duplicator is switched off. Place your old SSD in the Duplicator slot marked Source and the New SSD in to the slot marked Target. Press the On/Off switch to turn the Duplicator On, then hold down the Dup/PC switch for 4 seconds, this should now be Red, press the Start button. The tiny LED's along side each drive will flash and then turn Blue. The Progress Bar on the right below the Freecom badge will be Blue, these count down the progress of the data transfer, when the bar reaches 100% the transfer is complete. I waited for the Dup button to turn Blue as the Freecom imply that it will, but it doesn't. It took me a couple of hours to transfer 140GB. Turn the Duplicator Off and use the eject button to remove your New SSD.
Reinstall the New SSD in your computer, again beware of static. All being well your computer should reboot as normal only FASTER. Go into Start and type Partition in the search box. One of the options to appear will be "Create and Format Hard Disc Partitions" Click this and the Disc Management Window will open. If the your original SSD was smaller than the New SSD you will notice that only part of the new SSD is active. The disc has effectively been partitioned. Unbelievably the Windows Disc Manager will not allow you to enlarge the active partition to utilise all the disc space. The simple solution is to use a piece of Free software called AOMEI Partition Assistant Standard Edition. Follow the instructions on on how to resize a partition at SSDHDD.org. The general opinion is that this piece of software works without any risk of damaging the disc. Read the reviews here. I have to say it worked a treat.
The plan was to replace the existing OCZ Vertex 3 120GB SSD with an OCZ Vector 180GB SSD. I had tried cloning the disc while installed in the PC but I could not get the Free Acronis software supplied with the replacement SSD to install so I decided to use a Freecom Hard Drive Dock Duplicator...

The beauty of this piece of kit is, it does not have to be connected to a computer and you do not need any software to clone a disc. WARNING always backup your data before paying around with a HDD. See my comment at the end of this post.
Instructions
Carefully remove the drive you want to clone from your computer, beware of static, ground yourself before starting. Make sure the Duplicator is switched off. Place your old SSD in the Duplicator slot marked Source and the New SSD in to the slot marked Target. Press the On/Off switch to turn the Duplicator On, then hold down the Dup/PC switch for 4 seconds, this should now be Red, press the Start button. The tiny LED's along side each drive will flash and then turn Blue. The Progress Bar on the right below the Freecom badge will be Blue, these count down the progress of the data transfer, when the bar reaches 100% the transfer is complete. I waited for the Dup button to turn Blue as the Freecom imply that it will, but it doesn't. It took me a couple of hours to transfer 140GB. Turn the Duplicator Off and use the eject button to remove your New SSD.
Reinstall the New SSD in your computer, again beware of static. All being well your computer should reboot as normal only FASTER. Go into Start and type Partition in the search box. One of the options to appear will be "Create and Format Hard Disc Partitions" Click this and the Disc Management Window will open. If the your original SSD was smaller than the New SSD you will notice that only part of the new SSD is active. The disc has effectively been partitioned. Unbelievably the Windows Disc Manager will not allow you to enlarge the active partition to utilise all the disc space. The simple solution is to use a piece of Free software called AOMEI Partition Assistant Standard Edition. Follow the instructions on on how to resize a partition at SSDHDD.org. The general opinion is that this piece of software works without any risk of damaging the disc. Read the reviews here. I have to say it worked a treat.
Warning
My PC thinks it has had a heart transplant, the increase in performance is most welcome. Now for the heart stopper. For some strange reason I decided to put the OLD SSD back in the PC for starters. To my horror the PC would not Boot, there was an MBR problem, can't remember the exact error message. After fiddling around for a few moments I gave up and decided to put the NEW SSD in. Bingo, it booted up first go, and fast. Job done with only minimum heart failure. Still not sure what happened to the original HDD in the cloning process, but will try to find out and report back. Oh yes, shop around for your replacement SSD the prices seem to vary enormously even for the same item. The price of the OCZ Vector 180GB SSD varied from £52, what I paid for it, to £133!16/03/2015
Nest Smart Thermostat Can Be Hacked to Spy on Owners

In view of my previous post this may be of interest. A report on the Toms Guide Blog reveals that Google's Nest "smart" thermostats may not be the most secure devices in the "Internet of Things," it can be hacked into, three researchers showed today (Aug. 7) at the BlackHat security conference in Las Vegas.
Read more...
Subscribe to:
Posts (Atom)