24/04/2011

Firefox 4 Tab Problem

A couple of days ago the facility to open a blank Tab in Firefox 4 stopped working. This particular problem related to the new tab button. Whenever I click on the plus (+) symbol to open a new tab window, nothing seems to be happening. Clicking on File and then on the New Tab option doesn’t opens the new tab. Neither do the Ctrl + T works.

A Google for "Firefox 4 tab problem" suggested that the problem was caused by "Ask Toolbar" being incompatible with Firefox 4! I was not even aware I had the "Ask Toolbar" loaded! A forum thread offered the following solution:-

These are the steps to uninstall the Ask Toolbar from Windows XP, Windows Vista and Windows 7:-

For Windows XP:
  • Make sure all the Web browsers or there processes are closed.
  • Go to Start menu and Select “Control panel” and then select “Add/remove Programs”
  • Search the Ask Toolbar from the list of programs installed (or the program with Ask logo)
  • Click on Change/Remove to uninstall it.
Windows Vista:
  • Always close all the instance of Web Browsers or related programs.
  • Go to the following path Start > Control Panel.
  • Under Programs icon select “uninstall a Program”
  • Now Select the “Ask Toolbar” from the list and click on “Uninstall”
Windows 7:
  • Go to the following path: Start > Control Panel > Programs > Uninstall a Program.
  • Select the Ask Toolbar from the list of installed programs and right click to Uninstall.
I am pleased to report that the solution worked for me in Windows 7. I have to say when I first looked in the list of programmes I could not find Ask Toolbar. This is because it was listed as "Foxit PDF Creator Toolbar" but it was listed in the Publisher column under Ask.com.

04/04/2011

Firefox 4 Google Toolbar Problem - Fix - Updated

UPDATE: 25th April 2011 - The problem seems to have been resolved by a recent software update.

Since I upgraded to Firefox 4 I have been unable to select from the search box drop-down list

When you attempt a search from the search box on your Google Toolbar it may not allow you to select items from your drop-down list of web history or search suggestions.

As a workaround, try using your keyboard up and down arrows to navigate the drop-down list to select your search history, press return to select.

See previous post link

22/03/2011

Microsoft Program Stops Responding

The program stops responding when you try to open or to save a file in an Office 2002 program, in an Office 2003 program, in an Office 2007 program, or in an Office 2010 program.

You know the scenario, you are dashing to get off to college, the post is about to go or you have been typing for 2 hours and just remembered to save the doc for the first time. You open the save menu and click on a folder and the screen goes pale and you notice those dreaded words in the toolbar, (Not Responding), the program hangs. What do you do other than go and make a cup of tea? While you wait to see what happens!

I have Googled for a solution on a number of occasions but without luck. Today I found this Microsoft Support Article ID: 313937. It seems to have worked. The gist of the solution is making sure you have no "Mapped Network Drives" which are not connecting. See the article for the full story.

USB Drive Not Recognised: TestDisk

Awesome Utility: TestDisk

What do you do when your USB Memory Stick/Drive is not recognised when you try to read it. Well if it has the only copy of your dissertation the response probably lies somewhere between suicide and mucking your pants! That is what happened to a friend today, can I help, how can I not. Quick Google identified suggested the best option was a command line utility called TestDisk. Long time since I did DOS and stuff. The hard part was finding an idiot proof set of instructions how to use Testdisk! The nearest I ,managed was at SysAdminHell a post titled Awesome Utility: TestDisk. I suggest you download TestDisk and then go to the instructions at SysAdminHell.

I found placing TestDisk on another USB Drive worked best for me. After a bit of trial and nor too much error I managed to get the USB drive to boot. I looks as though the FAT32 Boot sector was corrupt. BEWARE of NOT EJECTING your USB Drives!

24/01/2011

Photoshop CS5 - Importing Scanned Images

Following on from my previous post about image resolution. I came across this Adobe TV tutorial by Peachpit TV for Photographers, which complements that post.

The tutorial covers the basics of scanning images for retouching and then goes on to show some basic retouch techniques. One useful tip relates to the use of the History Brush, not something I have ever used but I may after watching this.

Not sure who the the young lady is who gives the tutorial be she is easy to listen to for a change.

23/01/2011

The Myth of 72 dpi

If there is one thing guaranteed to start an argument among both computer types and photographers it is image resolution, particularly when it comes to uploading images to the web. Well rather than put my 2 penny worth into the pot I will refer you to an excellent site I came across on the web. Wayne Fulton's has a website that covers the whole subject of scanning and image resolution which he modestly calls "A Few Scanning Tips" it is a whole lot more than that.

There is so much fascinating information on this site I hardly knew where to start. So I chose the 72 dpi debate as this is the one that seems to crop up most frequently. The article you need to read is called "Say No to 72 dpi". Wayne not only talks a good talk he provides visual proof of his arguments as well.

Did you know why you should download images off the internet rather than cut and paste them? I suggest that you have a good look around Waynes site, it is a goldmine of fascinating information.

Other useful websites I came across whist looking for this information are included below.

Scanning and Printing Resolution Calculator
Image size Calculator
Fotosizer - Batch image resizing

09/12/2010

CAPS LOCKED ON

Had one of those strange occurrences this morning whilst working on my dissertation in Word, I hit the wrong key(s) which keys I have no idea and suddenly I AM TYPING IN CAPS AND NOTHING I DID WOULD TURN IT OFF. WHICH WAS A BIT OF A BALL ACHE AS I WAS FINISHING OFF A DRAFT OF MY DISSERTATION AND ABOUT TO DASH OFF TO A TUTORIAL. Enough of that! I hastily Googled "CAPS LOCKED ON KEYBOARD" and tried the first option in the list. They suggested holding down both shift keys at the same time and count 5 - BINGO it worked!

02/11/2010

Firefox Background Removal

When Mozilla installed version 3.6.10 of Firefox today a very irritating background appeared! Not immediately obvious how to remove this. Apparently you need to go to:->

Tools>Add-ons>Themes click the active background to uninstall.

21/08/2010

26/04/2010

Ipod/Iphone Caps Lock

To enter my router WEP password requires numbers and CAPS to be entered. It has driven me crackers entering CAPS when the default is lower case. I discovered the following fix:-

Settings -> General -> Keyboard -> Enable Caps Lock

Once this is enabled, tapping the shift key twice will turn on caps lock. When the caps lock is enabled, it will glow blue.

Brilliant

UPDATE

Not so brilliant, the caps lock will not stay locked as you toggle back and forth between alpha and numeric keyboards, bummer!

However - the simple answer is to enter your WAP password into Notes app and then when you need it cut and paste, simple really. It works for all my other network passwords as well, hooray!)

24/03/2010

Downloading a Quicktime Movie

I normally use the Firefox plug-in DownloadHelper to rip streaming video like YouTube or embedded movies, however occasionally it does not respond to embedded Quicktime movies. Here is a solution.

This only works with Firefox. Open the webpage containing the Quicktime video. On the Firefox toolbar at the top of the screen, click "Tools". Halfway down the page click on the button that says "Page Info". In the menu that opens click on the "Media" tab. Look down the list for the movie. It is possible that the entry will be greyed out, ignore this and highlight the entry. Further down the same page, towards bottom right, click on "Save As" and save the .mov file to wherever you want to store it.

Step 1 Saving the Movie
Click on the Tools button on the top of the page, go down and click on "page info"

Step 2 Get set up to download the video
A window with tabs will pop up. Click on the Tab marked Media

Step 3 Find the Video and save it
You look through the page info box until you find the Video you want. After you have found the video you click save as, enter the name you want it saved as, and save it!

Step 4 Update
If you want to download flash games off, like addicting games or anygaming website. All you have to do is download it like if it was a video like i showed and open it with your internet browser. And the best thing is that, when ever you play it, it will be the full screen. enjoy

Quicktime Controls Invisible in Firefox 3.5.8

When using Quicktime viewer in Firefox the control bar at the bottom of the console is usually blacked out and the controls are invisible. Curiously they do show very occasionally. Anyway here is a fix.

1. Right click on the browser icon the main icon on your Desktop of in tool bar not the one at the top left of the browser window.
2. Select properties
3. Go to the compatibility tab
4. Check the box for "Run this program in compatibility mode for:"
5. Make sure it says "Windows XP (Service Pack 2)" in the drop down list.
6. Press "OK" at the bottom
7. Reload Firefox

This solution will allow you to see the normal Quicktime timeline and volume options, etc. when watching a Quicktime video.

20/01/2010

View or Print a File Directory/Folder

Have you ever wanted to print out a list a directory/folder list of files from Windows Explorer, a bit like this:-


There is no simple way to do this in Vista, not sure about Windows 7 but I would be surprised if there was! The answer is to make a couple of tweaks to the registry, not as hard as it may sound and add a couple of files to the Windows directory/folder. There is a thread on the Vista Windows forum, which tells you how and provides the necessary files and registry tweaks, follow this link. It took me about 5 mins to work it out. The outcome will be two addition to the "Context Menu" as you will see from the screen-grab below. The option creates a text file in Notepad which you can view, edit and or print. Why don't Microsoft provide such an option? No don't answer that.

05/01/2010

Transferring BIG files

Have you ever had a problem sending a LARGE file to someone. Many email providers have an Max file size that you can send as an attachment. Sending films, PSD files etc can be a nightmare. I came across TransferBIGfiles How does it work? Here are the FAQ answers from the site:-

FAQ's

What is TransferBigFiles?
TransferBigFiles is the easiest way to share a bunch of files with friends, family or everybody in the world. There's no registration required to use the website. You can just go to the home page and start uploading some files.

What is the storage limit for my files?
TransferBigFiles does not limit the amount of space your account can use on our servers, the only storage limit we have is that your files may not be larger then one (1) gigabyte.

For how long are my files stored?
Files are stored for up to 5 days or until the download limit of 20 downloads is reached.

29/12/2009

Print off Google Calendar

Now is the time of year when my wife reminds me that she needs a new calendar. Being a cheapskate my normal practice is to open Outlook and print off the Outlook calendar, a month to a page, could not be easier.

But I now use Google Calendar to record my diary dates AND AMAZINGLY Google does not offer a way to print off the calendar other than 1 month at a time. Can you believe it.


There are a couple of solutions I found on the net, Wincalendar, being one, but it costs money. I found a workaround on the Google Calendar Forum it did not appear to work with my setup BUT after a bit of fiddling I managed to sort it out. So here is my solution:-


I use Firefox but I think this will work with IE as well.


Open your Google Calendar and set to show 1 month per page and set it to start at January 2010 unless you are reading this next year!


On the right hand side of the Calendar page there is a PRINT icon. When you click this you get a pop up window with a page view of the calendar. Choose the "Save As" option and click.


A further pop up appears with the options "Open With" or "Save File" choose "Save File".


Now the "Download" pop up appears, in my case this shows the calendar to have been downloaded as a PDF file. Right click on this and choose the option "Copy Download Link"


Open a text editor such as Notepad, Right Click and "Paste" you will find a link similar to the one below will appear (Don't Panic) This is the link to print off just January.


To print out the 12 months in one go you need to make a slight change to the link. Look for the numbers that I have highlighted, these are 20091228 and 20100201 you need to change the second one to read 20101231.


Select and Copy the link then paste into your Browser, in my case Firefox, and click. This will open up your default PDF software Acrobat Reader or in my case I use the Firefox PDF plugin Foxit Reader. This should display all 12 months of your calendar. You now can print off the 12 monthly pages.


"https://www.google.com/calendar/printable?ctz=Europe%2FLondon&dates=20091228%2F20100201&pgsz=letter&mode=MONTH&wkst=2&hl=en&src=YWpwZWVlQGdvb2dsZW1haWwuY29t&src=cGtobWwydDFhZTB1OGkxcGUyNXVybHJsOHNAZ3JvdXAuY2FsZW5kYXIuZ29vZ2xlLmNvbQ&src=ZDIxZHU5Zm92NHZkN2hnajNnZ2FhcWFzcmdAZ3JvdXAuY2FsZW5kYXIuZ29vZ2xlLmNvbQ&src=Z2ttYjA0M2UwNTBlM3RrMHJ0OWM1ZjNnazBAZ3JvdXAuY2FsZW5kYXIuZ29vZ2xlLmNvbQ&src=ZXFubmswamc3NmU5MWdhbjMzbGtpcDZzMDRAZ3JvdXAuY2FsZW5kYXIuZ29vZ2xlLmNvbQ&src=NW41ODBoM2tjcTlucmxqb2twdjY0cWZyMHNAZ3JvdXAuY2FsZW5kYXIuZ29vZ2xlLmNvbQ&src=bmVhcm5pbmVAZ29vZ2xlbWFpbC5jb20&src=amVubmlmZXJtbW9uZXlAZ29vZ2xlbWFpbC5jb20&src=bDdjMjJ2YWFpb3RsYTdocnExcmszZTA3Zm9AZ3JvdXAuY2FsZW5kYXIuZ29vZ2xlLmNvbQ&src=dWtfX2VuQGhvbGlkYXkuY2FsZW5kYXIuZ29vZ2xlLmNvbQ&pfs=NORMAL&po=AUTO&psdec=true&pbw=false&pjs=false&rand=1262045765365&pda=true"

14/08/2009

Samsung NC10 Sound Problem

I have a Samsung NC10 netbook and it is brilliant. The sound however has driven me mad. The speakers are tinny but worst of all the sound was horribly distorted even with earphones. After much fiddling I eventually found the solution. I opened the Realtek Sound Effect Manager in Control Panel. Under the Sound Effect tab there is a Karaoke icon, make sure that there is no X showing in the circle. If there is click to turn off. Set the environment to Padded Cell. Success sound back to normal! Make sure all the equaliser sliders are on Max

29/05/2009

Creative Photography - Transfers

If I give you all my secrets about inkjet (image) transfers I shall have to kill you so be warned!

The process of transferring an inkjet image or any similar image, photocopy, magazine picture etc using an acrylic medium has been around for a long time. If you Google any combination of those words you will find loads of stuff. I have listed a few of the links I found useful and or interesting.

I have used inkjet prints both dye and pigmented inks. After much experimentation I settled on a digital inkjet paper sold by Granthams, Blackpool. It is ColourLink Matt Inkjet Paper, single sided 100g (UPDATE - this paper is no longer available from this source, try Jessops Matt 100g). You can use almost any paper to start with. As for the transfer medium, I started off using PVA glue, BQ own brand is cheap. It works well but can be unpredictable. You can try anything which contains acrylic polymers, emulsion paint, acrylic primer/undercoat, gesso, acrylic astists paint etc. I ended up using the Rolls Royce of acrylic ploymers "Goldens Regular Gel (Matte)". It is worth a visit to Goldens website thay have lots of info about acrylic transfer.

You can see some of my transfer artwork on alistairparkerart.com go to Gallery and choose "mixed media"

Here are a few links:-

http://nonphotography.com/blog/
http://www.flickr.com/photos/forgottenpittsburgh/1414931085/
http://www.squidoo.com/inkjetimagetransfer
http://www.art-e-zine.co.uk/imagepaper.html

21/02/2009

Gmail: Searching for Unread Mail

There is no native means of searching for Unread Mail in Gmail. There is however a workaround. Enter is:unread in the Search Box, this will find all the Unread mail in the Inbox. Simple when you know how.

18/02/2009

What's gone wrong with AVG

I am not sure what AVG have done with the latest update to v8.1 but my XP laptop and my Vista64 Desktop will not update. Initially there was a problem with CTF files. I sorted that by deleating the currupt file. The next problem was every time there was an update the machines wanted to restart. Now I have a General Error. I have been around the forums and tried the various fixes suggest to no avail. I have installed and reinstalled again to no avail.

I have used AVG for as long as I can remember and have converted many others to the cause but along with many other, may be this is the time to change.

I am about to install Kaspersky Internet Security, available half price in W H Smiths at £23.50. Top of the pile in PC Pro tests, so here goes.

Photography a Criminal Offence

An item in Guardian 12 February 2009 warned that it will be a criminal offence to photograph police officers under anti-terrorism legislation which becomes law on Monday 16th Feb 09. Both professional and amateur photographers will be at risk of harassment under the new law. A major demonstration outside New Scotland Yard is planned for Monday by NUJ.

So I suppose the next time I take a photograph like this my feet won't touch the ground! But does he count? He is probably a civilian, in wolfs clothing!


Spotted on a surveillance job in Trafalgar Square.

20/01/2009

Recent Post Widget

If you look to the right of this column you will see that I have a list of recent posts. This is created by a Widget designed by Blogger Buster. this widget references a JavaScript that parses your blog's feed and displays the titles of the most recent posts in a list. It overcomes the limitations of the Blogger Archive list. The Blogger Buster site has a Script Creator Form on the site so there is no messing around with cutting and pasting scripts.

This is a image of the form -


Read the instructions before you use the form, I didn't read the instructions the first time I used it and fiddled around for ages trying to get it to work! You need to leave off the http:// and the last / from your URL when you load it into the form.

Occasionally this form may not be available if the site is under pressure. If that happens come back later when things have quietened down. There will be a message to this effect.

Get the Widget here.

07/01/2009

AVG update issue - Invalid update control CTF file

I am a great fan of AVG anti-virus but every now and again it does something stupid.This morning I was getting an error message:- "Invalid update control CTF file". A quick Google came up with all the usual crap about editing the registry etc. I thought, there has to be an easier way! Checked on the AVG site under support and at the top of the list was an item titled - "AVG update issue - Invalid update control CTF file". Which I read. I followed the instructions but the ino does not seem to apply to the FREE version. I could not find the place in the tool box which was suggested. It essentially suggested deleting all the files with ctf extension.

So I thought I will do it through Search in Windows Explorer, No ctf files. They may be hidden I thought, went into Tools> Folder Options> View and ticked Show hidden files and unticked Hide unprotected operating system files ( be sure to go back and change this when you have finished). I then searched for files with extension ctf. NOTHING drrrrr.... Then I noticed on the search menu there is an option to "Change whether hidden and system files are included" I thought I had done that all ready. However next search revealed 2 .ctf files which I duly deleted. Delighted to say next time I ran the AVG update it worked OK.

What do little old ladies do when they get these silly b***y problems? If they are anything like the little old ladies I know they ring me on a Sunday morning when I have just settled down with the paper!

31/10/2008

Cheap Software Scam - Beware

I cam across an advert at the top of my Googlemail page today for cheap software. A quick survey of the forums suggests that a download of Adobe Photoshop CS3 for £19.50 from www.pick-go.com is a scam.

Experiences seem to vary from paying and receiving nothing to others who have received a fully working copy with updates. The general opinion is that the serial numbers are keygen generated and are probably volume licence keys which do not require registration but are eligible for updates. Interesting to note there are no contact details on the site. Further comments here.

27/10/2008

Vista 64 bit Sound Recording Problem

My new computer runs under Vista 64 bit. Not the most user friendly operating system. Have Microsoft not heard the expression"if it ain't broke don't fix it"!

When I came to record the sound for an AV sequence using Audacity I found that it would not record either from the Internet of from the HD.

Checked all the usual things, preferences, control panel etc. I could only find two sound recording inputs, mic and line, no mixer!

Google wasn't much help, the usual, "check the drivers are up to date" rubbish. However with a bit more digging a helpful chap suggested the following solution.

Go to:- Control Panel> Sound> Recording Tab> right click on the white background and LOW AND BEHOLD a dialog box appears with the option to "Show Disabled Devices"! Which in my case was the Mixer. How bl**dy obtuse can Microsoft get? Why the hell do they not show these options in the control panel!

Anyway, problem solved, go to Audacity> Edit> Preferences> Audio I/O> Device there should noe be an option to select Mixer. Also interesting to note that when using Vista 64, in the Audacity Mixer Toolbar the device selection box is greyed out.

09/10/2008

Looking at Photographs

Check out this amazing photography site, PHOTOGRAPHY NOW. Worth a look just to see the amazing Java page turner! http://photography-now.net/

23/09/2008

Creating an Account at Flickr.com

How to join the Poulton Photographic Society Group at:-
http://www.flickr.com/photos/ppsoc/


Overview

• Create Yahoo ID

• Create Flickr Accounts

• Add PPSoc as a contact and mark as friend

• Send PPSoc a Flickr Mail requesting Membership of the Group

• Upload Photos to your Flickr account

• Add Photos to a Group Pool

• Order of Tasks


Create Yahoo! and Flickr Accounts

• Account Setup with a previous Yahoo! username

–On the Flicker main page, click “Sign Up”

– Enter your Yahoo! username and password and click “Sign In”

– Re-enter your password and click “Sign In”

– Choose a Flickr username, and click “Sign In”

• Account Setup without a previous Yahoo! username

–On the Flicker main page, click “Sign Up”

– In the “Don't have a Yahoo! ID?” box click “Sign Up”

– Fill in your information

• Check the “Create my free Yahoo! email address” box – this will simplify the setup process, and the members need not use the address.

• Do not provide an alternative email address

– Click “I Agree”

– After your Yahoo! account is set up, click “Continue to Yahoo! Flickr”

– Choose a Flickr username(does not have to be the same as YahooID), and click “Sign In”


Account Setup without a previous Yahoo! username


Account Setup with a previous Yahoo! username


General

  • Take some time after signing up to explore the website. There are some really interesting photos and features.
  • From any page, clicking the “Home” button in the top left corner will bring you to your Flickr Homepage
  • Manage your information and settings by clicking the “You” drop down menu, then clicking “Account”

– Buddy Icon: choose or upload a picture to act as your icon (optional)

– Profile: Add information about yourself (optional)


Upload Photos to Flickr

  • On your Flickr homepage, click the “You” drop-down menu.
  • Click the “Upload Photos” link.
  • Click the “Browse” button next to the first dialogue box.
  • Choose the file you want to upload and click “Ok”
  • Repeat for the other dialogue boxes, for up to six photos.
  • If you wish, add a Tag to all the photos
  • Click the “Private” radio button, and the “Friend” check box
  • Click “Upload”
  • You can now add descriptions and additional tags to each separate photo. When finished, click “Save”


Adding Photos to a Group Pool

• Sending photos from your library

– On your Flikr homepage click the “Your Photos”link in the right-hand column

– Chick on the picture you wish to send to the group’s pool.

– Above the picture, click the “Send to Group”button. Then click the group.

– Click “Yes” and “Ok” to complete the process.

– To easily move to the next photo, click on the photo shown in the “photostream” window. Repeat the steps and send each photo to the group pool.


Adding Photos to a Group Pool


06/07/2008

AVG 8.0 causes Firefox to CRASH

I have been experiencing what appeared to be random crashing of Firefox. This morning I realised after 2 crashes that these coincided with opening a new link. I can be slow on the uptake!

Then I remembered reading something about AVG 8.0 Link Scanner causing problems. I have disabled the Link Scanner and so far have not had another crash. So fingers crossed.

07/03/2008

30/11/2007

Photoshop Tutorials - Special Offer

Finding Photoshop tutorials that are easy to understand and which address the basics in a comprehensive manner is not easy. I can highly recommend tutorials by local photographer and world famous photo-blogger David Nightingale.

David is publishing via his website www.chromasia.com an excellent series of on-line Photoshop tutorials that are proving extremely popular. David was a university lecturer before he became a full time photographer and this shows in his easy to follow tutorial style.

The tutorials, published monthly, have so far covered :-
  • Tonal Range and the Curve tool
  • Toning coloured images
  • Black and White – part one
  • Landscapes: creating dramatic skies
  • Portraits: part one
  • Next month: An introduction to LAB colour mode.
Each tutorial comes with a set of down-loadable images for you to practice with, video clips to explain particular points and a printable pdf document.

There is a modest charge for each tutorial or an annual subscription is available for less tha the cost of a photography magazine. Dave Nightingale is offering PPS members a special limited period offer 25% discount for an annual subscriptions. For more information and a sample tutorial click here.

Or you can find out more about the individual tutorials by clicking this link.

08/11/2007

Shutterchance Workspace Problem

Processing images for upload to Shuterchance.

I noticed recently that some of my images were being degraded when uploaded to Shutterchance. This was mainly evident in well saturated colour images. See example here. After some experimentation and an exchange in the Shutterchance Forum I came to the conclusion that the problem was due to my images having an AdobeRGB profile whereas Shutterchance webpages appear to require images with an sRGB profile. Images which are not in sRGB are automatically converted on upload. As sRGB contains less colour information than Adobe RGB profiles there is a loss of colour information, ie some de-saturation!

This is my workaround:-

  1. Open your image in Photoshop (CS2: v9) and if the Workspace is not sRGB change it before you start any further processing.
  2. I would start by copying the image.
  3. To change to sRGB, go to Edit, Assign Profile, and choose sRGB, click OK.
  4. You can check the Workspace ID on the bottom margin of your image.
  5. The information displayed in the margin by default is the size of the image in pixels, this can be changed by clicking the black arrowhead in the margin, choose “Show” and you will get a list of options one of which will be “Document Profile”, this displays the Workspace identity.
  6. I set other image parameters as:-
    Dimensions 72 px/inch, smallest side dimension 700px or largest side maximum 1000px
    JPEG compression 12

I am no Workspace expert so if I you disagree with my comments I would be pleased if you would correct them.

11/09/2007

Bleeding Shadows or Highlights

A effect beloved of wedding photographers of old was to use a soft focus filter either on the camera or over the enlarger lens in the darkroom. When a diffusion filter is added to the lens when taking a picture, the highlights bleed into the shadows, lightening them and blurring the edges somewhat. If that same filter is used in the darkroom when printing a negative, the shadows bleed into the highlights. The technique also works well with images of flowers.

These effects can both be recreated in Photoshop.

The effect is rather dependent on image size. This tutorial is based on an image at 300 dpi.
  1. Make any cosmetic adjustments to your image, Levels, Curves etc.
  2. Duplicate the Background layer
  3. Select Filter> Blur> Gaussian Blur and set radius to 5.
  4. Immediately go to Edit> Fade Gaussian Blur and adjust the amount of Blur to suit.
  5. Change the Blend Mode to either Lighten or Darken dependant upon which effect you want.
Tip: If you are using this effect on portraits it can look a bit spooky if the eyes and teeth are blurred. To remove the blur from these areas add a layer mask ( the rectangle with circle in at the bottom of the layers palette) with a small soft brush paint over the eyes and teeth with black selected .
[Click image to enlarge]


09/09/2007

Cross Processing

[Click image to enlarge]
Cross processing is the creation of false colours in an image. Traditionally this was created by processing a slide film in negative film chemistry or less commonly vica versa.

The result is high contrast images with blown highlights and their colour balance completely skewed, with a strong green/yellow cast to highlights, blue shadows and magenta reds. Having said that cross-processing can also produce a low-contrast pastel look.

There are numerous ways of producing a cross processed effect in Photoshop. One of the most flexible and none destructive methods is to use the Curves tool to process the individual RGB channels. The secret of success of using this technique is to select the correct blend modes.

1. Open your image and make normal Levels and Curves adjustments.

2. Make sure you have the Layers Palette open

3. Select, Layer>New Adjustment Layer>Curves, a New Layer dialog box opens, now change the blend Mode to Color and click OK. The Curves adjustment Palette opens.

a. Click the Channel selector and choose RED Channel, Apply a shallow ” S” curve.

b. Select GREEN Channel and click on the centre of the diagonal line and push up to create a very shallow curve.

c. Select BLUE channel , drag the right hand end of the diagonal like down 1 square, drag the lower lefthand end up 1 square.

4. The image can be tweaked by opening a further Curves adjustment layer this time set the Blend Mode to Luminosity, select Layers>New Adjustment Layer>Curves, now change the Blend Mode to Luminosity. Introduce an S curve to adjust contrast if required.

5. Select Layer>New Fill Layer>Solid Color>Mode=Color, click OK. When the Color Picker opens enter the # “e5ec0c” this is a lime green colour, click OK. Reduce opacity to about 10 - 25% or to suite

6. All these adjustments can be tweaked to produce the effect you find most pleasing, don’t be afraid to experiment.

16/07/2007

History in the Making

I experienced a very emotional photographic moment today (16-07-07). Whilst on a visit to London at the weekend I decided on Monday morning to take a trip to The Truman Brewery in Brick Lane to see if I could catch any of the Art Student exhibitions, that's another story.

My last visit to the Brick Lane area was in October last year. I had a great day recording the vast amount of Graffiti in the area. At that time I also visited the location of a painting by the painter Nicholas Middleton who used the railway tunnel at the end of Pedley St, off Brick Lane, as the location for his painting "Scene from a Contemporary Novel". To my horror on my visit today I discovered the Pedley St and the Bridge are no more along with 90% of the Graffiti I recorded, including some classic Banksy stuff.

Why? Because, around what was the old Shoreditch station, which closed in June 2006, they are building a new station which will be part of the new Overground rail network covering London, as part of the developments for the Olympics. They call it progress. I know there are photographers out there who are recording the East End of London before the Olympics developments sweep history under the carpet. We have a duty as photographers to record the world as we find it. Get out there and get recording before it is too late. You will discover some great images in the process.

The images I recorded in October are now, I assume, of immense historical value.

To see a mix of the images I recorded in October 2006 and July 2007 click the image below to visit my Picasa Gallery or view the slide show.

Graffiti - Brick Lane Area


04/07/2007

Blue Screen of Death - Rescue

What to do when your Laptop Dies

I have been going to update my computer system since last Christmas but have not been able to make up my mind which way to jump. In the mean time I have been relying on my aging Dell Inspiron 8200 laptop which is at least 8 years old and gets plenty of hammer.

My very worst nightmare happened, it was only a matter of time! Everything ground to a halt and in the process of shutting everything down the dreaded Blue Screen appeared with the error message KERNEL_STACK_INPAGE_ERROR. According to Microsoft this could have been due to anyone of a number of possibilities all of which made me want to slit my throat there and then. From the unlikely to the unthinkable, new hardware or software, a boot sector virus, loose RAM, motherboard failure, IDE controller failure, HD failure. Because I did not make a note of the code which preceded the error message I had no way of working out which of these failure it could be. Instinct told me it was dread of dreads a HD failure!!!!! EXPLETIVE.......

Where do I go now? It was well past closing time so it was no use ringing the TechGuys at PC World, as though I would! Much better bet, a quick email to my son and heir, better known to some of you as Drewble, he sorts out this sort of thing for a living - HELP.

I awoke to find a reply from Andrew suggesting that I remove the HD from the laptop and insert it in an external HDD cady which could be run from a USB port. He recommended a 2.5in Icy HDD enclosure which I could have obtained fro my local Maplins for the sum of £29.99 but I discovered that PC World which is next door, had an Akasa Integral 2.5in external enclosure for £19.99, so that was the one I bought, I am a pensioner, almost. I also bought a new 2.5in HD for the Inspiron whilst I was at it, a Samsung 80GB HD for the princely sum of £59.99. So with the goodies under my arm I set off home more with hope than expectation.
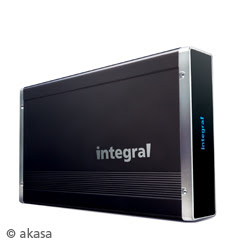
I removed the Inspiron HD and inserted it in the new enclosure, a simple job. The hardest part was getting the HD out of the laptop but it just needed a bit more brute force than I was applying. The only viable PC available to test the new gizzmo was my old Dell W98E. So I installed the drivers that came with the HDD enclosure and connected the USB (1.1) cable and the 5v USB power cable which were provided. The device, according to the literature works with W98E and USB 1.1. I was delighted to discover the HD was spinning in the enclosure but alas I could not see the drive, failure, may be not!

At this point I decided to fit the new Samsung HD to the Inspiron and reinstall XP. this was straight forward the laptop booted from the XP Pro CD and installed itself no problem. I decided to try the Akaska HDD before installing all the Windows updates. Plugged in the cables, again 1.1 on the Inspiron, - BINGO the laptop detected the device and autoplay found all my folders and files - YIPEEEEEEEE......... we were back in business.

The moral of this story is, isn't it always? Back up your data and preferably create a HD image so that you don't have the fag of reinstalling everything.

Write out 100 times - I must back up my data..........

WARNING - this fix is the equivalent of using a Defibrillator on a dying man it may only work once. If your HD does fire up you may only have the one chance to recover your data, so copy off the important stuff first. Mine ran long enough to recover "My Documents" and all sub-folders, which was pretty large but then it made a horrible grinding noise and stopped never to go again! Best of luck.

Don't blame me if it does not work but you can send a cheque if it does, I will leave the amount up to your gratefulness!

18/06/2007

Ghost Ship


This is the method I used to create the image below from the image above:-
  1. Duplicate background layer, Filter> Styilize> Solarize, Gaussian Blur> 12, Blend> Exclusion.
  2. Copy and past as new layer a texture image. I used a cracked old plaster wall. Blend> Vivid Light and adjust opacity to suit.
  3. Levels Adjustment layer - tweak to suit.
  4. Add New Layer and Fill with colour R:229, G:174, B:43, Blend> Multiply, adjust Opacity to suite
  5. Hue/Saturation Adjustment Layer - tweak Hue and Saturation to suit.


The blog version of this image can be seen here.

02/06/2007

Salt Print Effect

One of the earliest photographic printing papers, attributed to Fox Talbot, was made by coating paper with Sodium Chloride (Salt) and Silver Nitrate. Objects were placed on it and then exposed to sunlight for a number of hours. The resultant print had a distinct texture and could vary in colour from brown through yellow to violet.
  1. Texture and Balance - Duplicate background layer and find egdes (Filter> Stylize> Find Edges) . Apply Dry Brush filter (Filter> Artistic> Dry Brush) Size 1, Detail 7, Texture 3. Change blend to Overlay at 25% opacity. Add Curves Adjustment Layer increasing contrast with an S curve. Add a Levels Adjustment Layer, move centre slider to 0.50.
  2. Second Texture - Add new layer and Edit> Fill with 50% grey. Add Filter> Texture> Grain, select Clumped grain, Intensity 33, Contrast 50,. On same layer add Filter> Distort> Glass, Distortion 18, Smoothness 7, set to Frosted. Blend mode Pin Light.
  3. Colour and Paper Texture - Add a Hue/Saturation adjustment layer. Click Colorize and set Hue to 7 and Saturation to 22. Add new layer as in 2, Edit, Fill with 50% Grey, Filter> Texture> Grain use Vertical graion, Intensity 2, Contrast 50, Blend mode Vivid Light.
  4. Finish - Create new layer fill with Clouds Filter>Render> Clouds. Set blend mode to Hard Mix and Opacity to 3%.
The technique works best on images without any blown highlights.

Before

After

05/05/2007

Make a Picture Grid using Picasa

How often have you wanted to make a grid of photographs? OK what is a picture grid, well checkout the example above, yes, it's a Collage. You can do this in Photoshop but it will take you an hour or so. In Picasa it is the matter of a few moments. If you don't know anything about Picasa, it is a free image editing programme from Google, click the link to find out more.
On the Main Picasa page there is a button at the bottom named "Collage". But before you click this you need to select your images, ok have a look first if you must.
Search through the Album views, select your images by highlighting it, the image will appear in the "Photo Tray" bottom left, click the "Hold" button to select the image. Continue to select all the images you want to include in your Collage by adding them to the Photo Tray.
When you have accumulated the required number of images, click the "Collage" button, choose the option "Picture Grid" and choose a place to file your Collage. The option creates a SQUARE grid of images 10x10, 20x20 100x100 etc. If you do not select the required number of images to fill the grid ie only 95 images Picasa will duplicate 5 images from your selection to fill the gaps and give you a round 100 images and a 10x10 grid, you get the idea!.
Once you have saved your file you can modify it in Photoshop as I have done below, to add text or to fiddle with as you see fit.

27/04/2007

Photobloging

Getting Started
For those interested in starting a Photoblog here are a few links to get you started. For the absolute beginner with no knowledge of webpage design I would strongly reccomend that you look at the Shutterchance option for getting a blog up and running straight out of the box. Lots of information available through Photoblogs-wiki.

Blog Hosting Options

Blogger - http://help.blogger.com/
Flickr - http://www.flickr.com/
Pixelpost - http://www.pixelpost.org/
Shutterchance (This is my recommended photobloging choice) - http://shutterchance.com/
PixyBlog - http://www.pixyblog.com/

Recommended Blogs
Photoshau - http://photoschau.de/index.php
Chromasia - http://www.chromasia.com/iblog/
Daily Walks - http://www.dianevarner.com/
David Kleinert - http://davidkphotography.com/
Mal - http://mal.shutterchance.com/
Eddyhead - http://eddyrhead.shutterchance.com/
Redshift - http://redshift.shutterchance.com/
SerialPhotographer - http://www.serialphotographer.co.uk/index.php
Drewble - http://www.25sept.com/
Niko - http://www.nikoslaskaridis.com/
Vernon Trent - http://www.xoverip.info/pb/index.php
MaxBlack - http://maxblack.shutterchance.com/
Digiphotology - http://digiphotology.shutterchance.com
Digiphotology.com - http://www.digiphotology.com

Online Competitions
PhotoFriday - http://www.photofriday.com/
Vazaar - http://www.vazaar.com/
WeeklyShot - http://www.weeklyshot.org/
UniqueChallenge - http://www.uniqueexposures.com/challenge/
TuesdayChallenge - http://www.tuesdaychallenge.co.uk/index.php

Promote your blog
Onexposure - http://www.onexposure.net/
Photobloggies - http://www.photobloggies.org/
Photoblogs.org - http://www.photoblogs.org/
Coolphotoblogs - coolphotoblogs - http://www.coolphotoblogs.com/
VFXY Photo - http://photos.vfxy.com/photoblogs/971
PhotoblogCommunities - http://www.photoblog-community.com/Home.php

Useful sources of info
Photoblogs - wiki - (good place to start) - http://wiki.photoblogs.org/wiki/Main_Page
Photoshooter Sam - http://buzz9.wordpress.com/favourite-photoblogs/
Google Analylitics - http://www.google.com/analytics/
Wiki - http://en.wikipedia.org/wiki/Photoblog
http://del.icio.us/
Photo Editing - http://www.cellsea.com/java-cellsea/media/index.htm
Picasa - Album and Image Editing - http://picasa.google.co.uk/#utm_campaign=en&utm_source=en-ha-emea-uk-google&utm_medium=ha&utm_term=picasa
Picasa Video Tutorials http://www.campgroundcomputerheroes.com/tutorials.htm

24/04/2007

Photoblog

This page was constructed as part of a talk on "Photobloging" to demonstrate the image size limitations of using Blogger as the basis of a photoblog. I am sure that there are hacks thak can be applied to the Blogger template to allow the posting of larger images. I love Blogger as a weblog but there are better solutions for photobloging. My suggestion would be Shutterchance, see this non-exhaustive list for more options


A shot of the boardwalk at Lytham Lifeboat Station.

This is a composite shot with an added sky, taken in the same location but on a different day. The image has been toned using the blue channel in Levels.