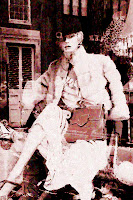
One of the earliest photographic printing papers, attributed to Fox Talbot, was made by coating paper with Sodium Chloride (Salt) and Silver Nitrate. Objects were placed on it and then exposed to sunlight for a number of hours. The resultant print had a distinct texture and could vary in colour from brown through yellow to violet.
- Texture and Balance - Duplicate background layer and find egdes (Filter> Stylize> Find Edges) . Apply Dry Brush filter (Filter> Artistic> Dry Brush) Size 1, Detail 7, Texture 3. Change blend to Overlay at 25% opacity. Add Curves Adjustment Layer increasing contrast with an S curve. Add a Levels Adjustment Layer, move centre slider to 0.50.
- Second Texture - Add new layer and Edit> Fill with 50% grey. Add Filter> Texture> Grain, select Clumped grain, Intensity 33, Contrast 50,. On same layer add Filter> Distort> Glass, Distortion 18, Smoothness 7, set to Frosted. Blend mode Pin Light.
- Colour and Paper Texture - Add a Hue/Saturation adjustment layer. Click Colorize and set Hue to 7 and Saturation to 22. Add new layer as in 2, Edit, Fill with 50% Grey, Filter> Texture> Grain use Vertical graion, Intensity 2, Contrast 50, Blend mode Vivid Light.
- Finish - Create new layer fill with Clouds Filter>Render> Clouds. Set blend mode to Hard Mix and Opacity to 3%.
The technique works best on images without any blown highlights.
Before

After