Showing posts with label tutorial. Show all posts

30/11/2007

Photoshop Tutorials - Special Offer

Finding Photoshop tutorials that are easy to understand and which address the basics in a comprehensive manner is not easy. I can highly recommend tutorials by local photographer and world famous photo-blogger David Nightingale.

David is publishing via his website www.chromasia.com an excellent series of on-line Photoshop tutorials that are proving extremely popular. David was a university lecturer before he became a full time photographer and this shows in his easy to follow tutorial style.

The tutorials, published monthly, have so far covered :-
  • Tonal Range and the Curve tool
  • Toning coloured images
  • Black and White – part one
  • Landscapes: creating dramatic skies
  • Portraits: part one
  • Next month: An introduction to LAB colour mode.
Each tutorial comes with a set of down-loadable images for you to practice with, video clips to explain particular points and a printable pdf document.

There is a modest charge for each tutorial or an annual subscription is available for less tha the cost of a photography magazine. Dave Nightingale is offering PPS members a special limited period offer 25% discount for an annual subscriptions. For more information and a sample tutorial click here.

Or you can find out more about the individual tutorials by clicking this link.

11/09/2007

Bleeding Shadows or Highlights

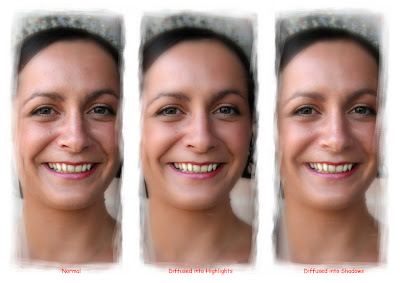
A effect beloved of wedding photographers of old was to use a soft focus filter either on the camera or over the enlarger lens in the darkroom. When a diffusion filter is added to the lens when taking a picture, the highlights bleed into the shadows, lightening them and blurring the edges somewhat. If that same filter is used in the darkroom when printing a negative, the shadows bleed into the highlights. The technique also works well with images of flowers.

These effects can both be recreated in Photoshop.

The effect is rather dependent on image size. This tutorial is based on an image at 300 dpi.
  1. Make any cosmetic adjustments to your image, Levels, Curves etc.
  2. Duplicate the Background layer
  3. Select Filter> Blur> Gaussian Blur and set radius to 5.
  4. Immediately go to Edit> Fade Gaussian Blur and adjust the amount of Blur to suit.
  5. Change the Blend Mode to either Lighten or Darken dependant upon which effect you want.
Tip: If you are using this effect on portraits it can look a bit spooky if the eyes and teeth are blurred. To remove the blur from these areas add a layer mask ( the rectangle with circle in at the bottom of the layers palette) with a small soft brush paint over the eyes and teeth with black selected .
[Click image to enlarge]


09/09/2007

Cross Processing

[Click image to enlarge]
Cross processing is the creation of false colours in an image. Traditionally this was created by processing a slide film in negative film chemistry or less commonly vica versa.

The result is high contrast images with blown highlights and their colour balance completely skewed, with a strong green/yellow cast to highlights, blue shadows and magenta reds. Having said that cross-processing can also produce a low-contrast pastel look.

There are numerous ways of producing a cross processed effect in Photoshop. One of the most flexible and none destructive methods is to use the Curves tool to process the individual RGB channels. The secret of success of using this technique is to select the correct blend modes.

1. Open your image and make normal Levels and Curves adjustments.

2. Make sure you have the Layers Palette open

3. Select, Layer>New Adjustment Layer>Curves, a New Layer dialog box opens, now change the blend Mode to Color and click OK. The Curves adjustment Palette opens.

a. Click the Channel selector and choose RED Channel, Apply a shallow ” S” curve.

b. Select GREEN Channel and click on the centre of the diagonal line and push up to create a very shallow curve.

c. Select BLUE channel , drag the right hand end of the diagonal like down 1 square, drag the lower lefthand end up 1 square.

4. The image can be tweaked by opening a further Curves adjustment layer this time set the Blend Mode to Luminosity, select Layers>New Adjustment Layer>Curves, now change the Blend Mode to Luminosity. Introduce an S curve to adjust contrast if required.

5. Select Layer>New Fill Layer>Solid Color>Mode=Color, click OK. When the Color Picker opens enter the # “e5ec0c” this is a lime green colour, click OK. Reduce opacity to about 10 - 25% or to suite

6. All these adjustments can be tweaked to produce the effect you find most pleasing, don’t be afraid to experiment.

04/07/2007

Blue Screen of Death - Rescue

What to do when your Laptop Dies

I have been going to update my computer system since last Christmas but have not been able to make up my mind which way to jump. In the mean time I have been relying on my aging Dell Inspiron 8200 laptop which is at least 8 years old and gets plenty of hammer.

My very worst nightmare happened, it was only a matter of time! Everything ground to a halt and in the process of shutting everything down the dreaded Blue Screen appeared with the error message KERNEL_STACK_INPAGE_ERROR. According to Microsoft this could have been due to anyone of a number of possibilities all of which made me want to slit my throat there and then. From the unlikely to the unthinkable, new hardware or software, a boot sector virus, loose RAM, motherboard failure, IDE controller failure, HD failure. Because I did not make a note of the code which preceded the error message I had no way of working out which of these failure it could be. Instinct told me it was dread of dreads a HD failure!!!!! EXPLETIVE.......

Where do I go now? It was well past closing time so it was no use ringing the TechGuys at PC World, as though I would! Much better bet, a quick email to my son and heir, better known to some of you as Drewble, he sorts out this sort of thing for a living - HELP.

I awoke to find a reply from Andrew suggesting that I remove the HD from the laptop and insert it in an external HDD cady which could be run from a USB port. He recommended a 2.5in Icy HDD enclosure which I could have obtained fro my local Maplins for the sum of £29.99 but I discovered that PC World which is next door, had an Akasa Integral 2.5in external enclosure for £19.99, so that was the one I bought, I am a pensioner, almost. I also bought a new 2.5in HD for the Inspiron whilst I was at it, a Samsung 80GB HD for the princely sum of £59.99. So with the goodies under my arm I set off home more with hope than expectation.

I removed the Inspiron HD and inserted it in the new enclosure, a simple job. The hardest part was getting the HD out of the laptop but it just needed a bit more brute force than I was applying. The only viable PC available to test the new gizzmo was my old Dell W98E. So I installed the drivers that came with the HDD enclosure and connected the USB (1.1) cable and the 5v USB power cable which were provided. The device, according to the literature works with W98E and USB 1.1. I was delighted to discover the HD was spinning in the enclosure but alas I could not see the drive, failure, may be not!

At this point I decided to fit the new Samsung HD to the Inspiron and reinstall XP. this was straight forward the laptop booted from the XP Pro CD and installed itself no problem. I decided to try the Akaska HDD before installing all the Windows updates. Plugged in the cables, again 1.1 on the Inspiron, - BINGO the laptop detected the device and autoplay found all my folders and files - YIPEEEEEEEE......... we were back in business.

The moral of this story is, isn't it always? Back up your data and preferably create a HD image so that you don't have the fag of reinstalling everything.

Write out 100 times - I must back up my data..........

WARNING - this fix is the equivalent of using a Defibrillator on a dying man it may only work once. If your HD does fire up you may only have the one chance to recover your data, so copy off the important stuff first. Mine ran long enough to recover "My Documents" and all sub-folders, which was pretty large but then it made a horrible grinding noise and stopped never to go again! Best of luck.

Don't blame me if it does not work but you can send a cheque if it does, I will leave the amount up to your gratefulness!
02/06/2007

Salt Print Effect

One of the earliest photographic printing papers, attributed to Fox Talbot, was made by coating paper with Sodium Chloride (Salt) and Silver Nitrate. Objects were placed on it and then exposed to sunlight for a number of hours. The resultant print had a distinct texture and could vary in colour from brown through yellow to violet.
  1. Texture and Balance - Duplicate background layer and find egdes (Filter> Stylize> Find Edges) . Apply Dry Brush filter (Filter> Artistic> Dry Brush) Size 1, Detail 7, Texture 3. Change blend to Overlay at 25% opacity. Add Curves Adjustment Layer increasing contrast with an S curve. Add a Levels Adjustment Layer, move centre slider to 0.50.
  2. Second Texture - Add new layer and Edit> Fill with 50% grey. Add Filter> Texture> Grain, select Clumped grain, Intensity 33, Contrast 50,. On same layer add Filter> Distort> Glass, Distortion 18, Smoothness 7, set to Frosted. Blend mode Pin Light.
  3. Colour and Paper Texture - Add a Hue/Saturation adjustment layer. Click Colorize and set Hue to 7 and Saturation to 22. Add new layer as in 2, Edit, Fill with 50% Grey, Filter> Texture> Grain use Vertical graion, Intensity 2, Contrast 50, Blend mode Vivid Light.
  4. Finish - Create new layer fill with Clouds Filter>Render> Clouds. Set blend mode to Hard Mix and Opacity to 3%.
The technique works best on images without any blown highlights.

Before

After

05/05/2007

Make a Picture Grid using Picasa

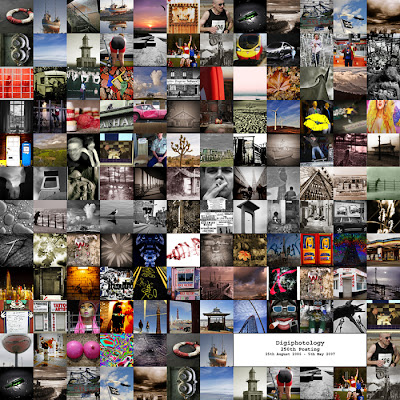
How often have you wanted to make a grid of photographs? OK what is a picture grid, well checkout the example above, yes, it's a Collage. You can do this in Photoshop but it will take you an hour or so. In Picasa it is the matter of a few moments. If you don't know anything about Picasa, it is a free image editing programme from Google, click the link to find out more.
On the Main Picasa page there is a button at the bottom named "Collage". But before you click this you need to select your images, ok have a look first if you must.
Search through the Album views, select your images by highlighting it, the image will appear in the "Photo Tray" bottom left, click the "Hold" button to select the image. Continue to select all the images you want to include in your Collage by adding them to the Photo Tray.
When you have accumulated the required number of images, click the "Collage" button, choose the option "Picture Grid" and choose a place to file your Collage. The option creates a SQUARE grid of images 10x10, 20x20 100x100 etc. If you do not select the required number of images to fill the grid ie only 95 images Picasa will duplicate 5 images from your selection to fill the gaps and give you a round 100 images and a 10x10 grid, you get the idea!.
Once you have saved your file you can modify it in Photoshop as I have done below, to add text or to fiddle with as you see fit.

19/11/2006

Burning and Dodging Non-Destructively

The Dodge and Burn tools in Photoshop are used for lightening or darkening areas of an image. Straight out of the box they can be a bit difficult to control and can be quite destructive.

Procedure for Non-Destructive Dodge and Burn
  1. Open the image and make any basic adjustments.
  2. Create a new layer by holding down the ALT key whilst clicking the New Layer icon at the bottom of the Layers palette. When the dialog box opens change Mode to Soft Light. Press ALT and F to select the Tick Box at he bottom of the box. The legend states "Fill with soft light neutral colour 50% grey.
  3. Select an appropriate size soft brush, set opacity to 10% or slightly less. To start Burning in (Darkening), make sure the new layer is selected. Press D to ensure the colour palette is set to Black and White, make sure the top colour is Black, if it is not press X. You can toggle between Black and White by pressing X. Start brushing over the area you wish to Darken or Burn.
  4. To Lighten or Dodge a dark area toggle the Palette to White and proceed as for Burning.
  5. To make corrections you have to set the palette colour to 50% Grey. To do this open the colour palette by clicking the Black/White icon when the colour pallet opens, make sure Web Colors is NOT ticked. To select 50% Grey, in the box marked with # enter 808080.
  6. Select an appropriate size soft brush, set opacity to 10% or slightly less. Start brushing over the area you wish to correct.

If you found this difficult to follow try this Video Tutorial by Geoff Riggs, he demonstrates the technique quite well.

Revised: 11th December 2007