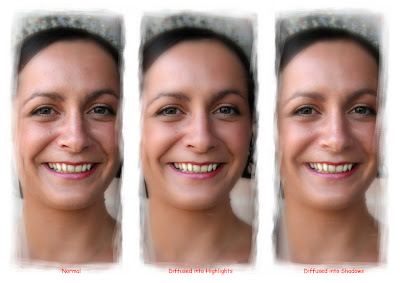
A effect beloved of wedding photographers of old was to use a soft focus filter either on the camera or over the enlarger lens in the darkroom. When a diffusion filter is added to the lens when taking a picture, the highlights bleed into the shadows, lightening them and blurring the edges somewhat. If that same filter is used in the darkroom when printing a negative, the shadows bleed into the highlights. The technique also works well with images of flowers.
These effects can both be recreated in Photoshop.
The effect is rather dependent on image size. This tutorial is based on an image at 300 dpi.
- Make any cosmetic adjustments to your image, Levels, Curves etc.
- Duplicate the Background layer
- Select Filter> Blur> Gaussian Blur and set radius to 5.
- Immediately go to Edit> Fade Gaussian Blur and adjust the amount of Blur to suit.
- Change the Blend Mode to either Lighten or Darken dependant upon which effect you want.
Tip: If you are using this effect on portraits it can look a bit spooky if the eyes and teeth are blurred. To remove the blur from these areas add a layer mask ( the rectangle with circle in at the bottom of the layers palette) with a small soft brush paint over the eyes and teeth with black selected .
[Click image to enlarge]

No comments:
Post a Comment