 Introduction
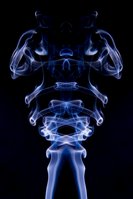
Photographs of smoke are some of the most evocative images. Fluid, ghostly shapes that stimulate your imagination and emotions. A great table top activity for a rainy evening.
Equipment- A tripod.
- A camera which can be set on manual focus and manual shutter speed and aperture. I use a Canon 20D.
- A flashgun which can be fired remotely. Mine here is an ancient Cobra 700AF. The flash source should be as powerful as possible.
- A means of triggering the flashgun. I can use my Cobra with a remote lead which is part of the flashgun kit. But I chose to use a flash "slave trigger" connected to the main flash hotshoe fitting. These days you may have the luxury of a wireless trigger outfit or a modern flashgun Master/Slave setup for off camera flash.
- If you are using a slave you will need on camera flash or small hotshoe flashgun to trigger the main flash.
- Black background, I used a black tee shirt, velvet is the material of choice but expensive. You can use black card or paper but the surface can be reflective and you may get hot spots. This decision is crucial if you want clean backgrounds for your images.
- Lightbox, as you need to work in a dark room, this is used as a working light so you can see the smoke and does not really contribute to the final image. I have change to using one of these stick on LED cupboard lights you can buy in "Pound" shops for very little money Make sure this does not spill onto the background.
- Smoke source. Incense or Jos sticks seem favourite for this.
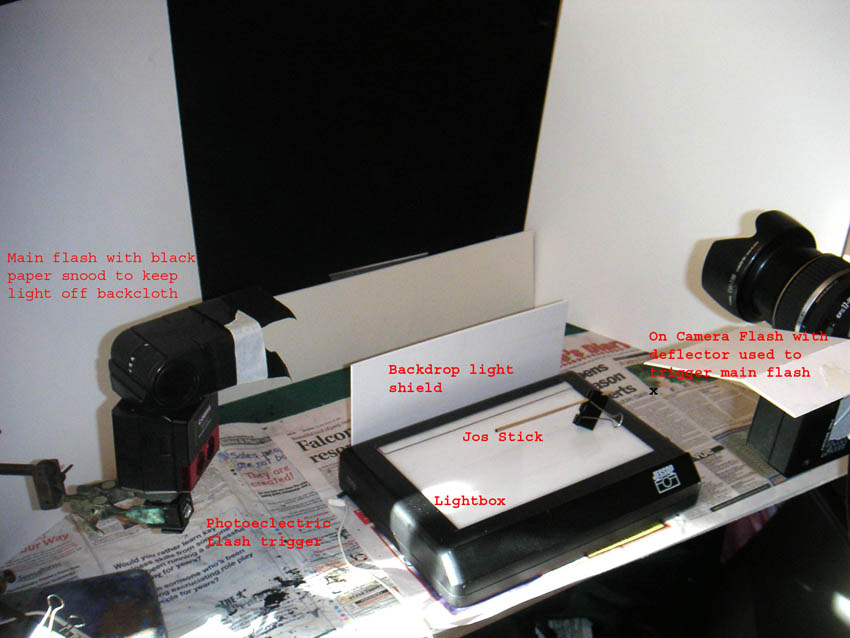
SetupThe secret of success for photographing smoke is to ensure the back ground is really black. Use black material, ensure it is as far behind the position of the smoke source as possible, at least 12 inches (30cm). Make sure no stray light falls on the background from the light box or any of the flash guns. Use cardboard to shield the background. See the Set up image. The room should be in darkness when you are taking your shots.
 Click image to enlarge
- Fix camera to a steady tripod, position 12-18 ( 30-45cm) inches from smoke,
- Use manual focus. Use the edge of a piece of card positioned in the same plane as the smoke source as a focusing aid.
- With my set up I use 1/60th at f11 in manual mode. Some workers suggest using a wide aperture (f4.5) to keep the background out of focus and to gather as much light as possible. The only problem with this is your smoke may drift out of focus.
- I use a small flash gun (Jessops 100M) fitted in the camera hotshoe. This is fitted with a cardboard deflector to keep the flash off the background and to deflect the light towards the main flash gun slave trigger. But you may use a cable or other remote trigger device.
- Exposure is a matter of trial and error. Run off a bunch of test shots. Don't forget you can move the flash gun within limits to alter the exposure.
- The main flash source should be in line with the smoke source and 90 degrees to the axis of the camera and the same height as the camera.It may help to make a Snnot for the flashgun, I used aluminium foil but thin card (cereal packet) would do.
- Although you can shoot jpg images you will have more post processing options if you shoot in Raw.
Taking your shotLight your incense stick and mount more or less horizontally. I used a bulldog clip but you can use Blue tack or Plasticine (you need to be able to move the stick as it burns down). Just how far below the line of your lens you need to be will have to be determined by experimentation, start about 12 inches (30cm) below your lens for starters. You can blow on the stick to encourage it to smoke but the best images are obtained in very still air, so keep the doors and windows closed and don't flap about. Beware you need to enjoy the smell of incense it can be very pervasive and clings like the proverbial, don't wear you best suit! Best not to do this in a confined space, not sure what the health implications are for inhaling Jos stick smoke. Be patient and keep your finger on the button, a degree of anticipation is required.
Post Processing Using PhotoshopFor simplicity I will discuss processing jpg images. Use Image> Adjust> Levels to ensure a black background and maximum detail in smoke. You can play with the sliders or use the shadow and highlight color droppers in the bottom right corner.
If your background looks a bit grey use the Shadow color dropper, the one on the left, to sample a section of the background. This should make it turn black, if it does not press the "alt" key and the Reset button (Normally the Cancel button) and have another go. You can do the same with the highlight dropper.
There are numerous ways to change the colour of the image. The simplest choice is Image> Adjust> Hue/Saturation. Check the Colorize box and play with the Hue and Saturation sliders.
Most images do not need sharpening. If you want to, try, convert to Lab Color and use Unsharp Mask in CS or Smart Sharpen in CS2 or later, convert back to RGB afterwards.
To create even more interesting images try duplicating and flipping layers, blend using Screen mode.
For more info try Googling - "Photographing Smoke"
Check out the work of artist
Pae WhiteYou can see examples of some of my smoke images
here.
Updated 16/09/10


 [Click image to enlarge]

 How often have you wanted to make a grid of photographs? OK what is a picture grid, well checkout the example above, yes, it's a Collage. You can do this in Photoshop but it will take you an hour or so. In Picasa it is the matter of a few moments. If you don't know anything about Picasa, it is a free image editing programme from Google, click the link to find out more.


 Before contrast mask
 After contrast mask
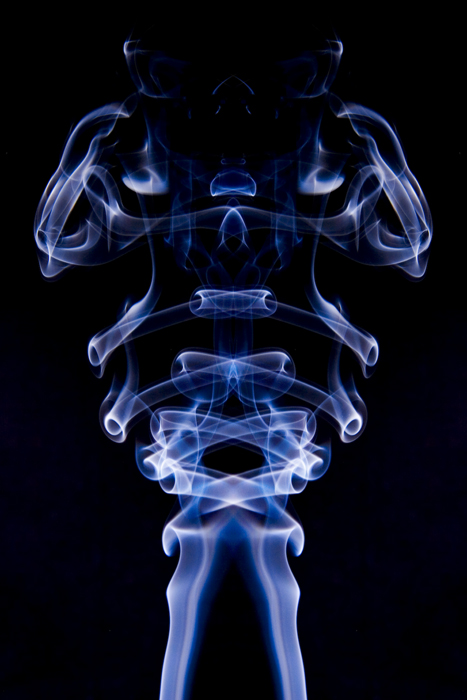
 Click image to enlarge