18/10/2013

Free Up Disk Space on a Solid State Drive (SSD) in Windows 7

Like many folk these days my main PC main drive (Drive C:) is a Solid State Drive (SSD).  Due to the cost of these devices it is tempting to fit a much smaller capacity than a typical mechanical hard drive (HDD),  mine SSD is only 120GB. This small size means you have to be very careful about conserving disc space. For example I locate most of my non critical software on a second mechanical hard drive (Drive D:). Drive C: is reserved for the operating system and the likes of Adobe Photoshop. This means that rather sooner than later you will face the "not enough free space" problem no matter how careful you are. Which is the problem I just ran into. I have been quite strict about running the standard Windows 7 Disk Cleanup utility. I have also been careful to delete or relocating any unwanted software.

When searching for a solution I came across a very good blog post: 7 Ways to Free Up Disk Space on an SSD in Windows 7.  The post suggested followin these steps:-
  1. Disable hibernation 
  2. Decrease the size of the page file
  3. Turn off System Restore
  4. Perform a Disk Cleanup regularly
  5. Use a third party disk cleaning tool regularly
  6. Uninstall programs you do not use
  7. Disable File Content Indexing
I followed most of the instructions and managed to release 12 GB of space, that's 10%.
I missed out steps 3 - Turn Off System Restore and 5 - Use Third Party Cleaning Tool. But I will look into these options later.The two steps that seemed to make the biggest difference where steps 2 and 7.

Follow this link to the original blog post.

13/10/2013

The Perfect Yorkshire Pudding Recipe

I know cooking is not normally the subject of my blog posts but I think I may have cracked the Yorkshire Pudding bogey that has been blighting my culinary efforts for years! So I need to record the recipe for future reference.

The general principle is copied from here. But like so many recipes there is always a snag, the way that recipe is worded could lead to the wrong amount of flour being used. But as I have a scientists mind the way the ingredients in recipe from the link were proportioned made sense to me. I have rewritten the recipe to make it clearer, hopefully avoiding any possible pitfalls.

Ingredients:-
This sufficient to make about 12 puddings using a standard size muffin tray .
  • Crack 4 fresh eggs of any size (I used large) into a measuring jug, note the volume and tip into your mixing bowl.
  • Measure the same volume of skimmed milk and add to mixing bowl. If you use semi-skimmed or whole milk dilute half and half with water. Whisk the eggs and milk together (I did not bother).
  • Weigh as many grams of plain flour as you had volume (ml) of eggs ie 150 ml eggs = 150 grams flour. Add to the egg and milk using a sieve (don't worry if you don't have a sieve).
  • Whisk by hand or with an electric whisk until just single cream consistency with no lumps, don't over do it.
  • Add a half a level teaspoon of salt and optionally, a shake of pepper.
Allow to stand for at least 30 min. Before use add 2 tablespoons (30ml) water and stir in thoroughly.

You can use a 12 portion non-stick muffin tray or a roasting tray about 12x8 inches, 10x10 inches.

Add a teaspoon (5ml) of of Rape oil (this is what I used because it has a high smoke point), light olive oil, sunflower oil or beef dripping to each well or 30 ml oil to roasting tin. Place in oven at 230C, (220C fan oven) until oil/fat is smoking takes about 15 min.

Remove hot tray from oven (CAREFUL). I hold tray over the gas hob to keep oil sizzling hot while I add the batter. Fill each compartment about two thirds to three quarters full.

Immediately return to oven for 25 min. When time is up turn off oven and leave in for another 5 min. Keep warm until served.

Using this method the Yorkshires I produced were voted my best effort ever. I thought so as well!

Prep time = 15min, Resting time = 30 min, Cooking time = 25 min, Total = 1 hr 10 min


28/09/2013

Broken Earphone Jack Removal from iPad or iPhone

My iPad slipped off the bed the other day and landed on the earphone jack (Apple Earphones) snapping it off flush with the iPad case. The problem was now how to get the broken jack out of the socket? This is my fix.

There was the vestige of the centre core protruding but not enough to catch hold of. I discovered that the plastic remaining in the socket could be levered out with the tip of a craft knife or you could use a pin to remove the top plastic ring insulating ring of the jack left in the socket. For my fix to work you have to remove this bit of plastic. You maybe able to shake it out or hook it out with the bent tip of a pin.

Materials

  • Pin
  • Satay stick, wooden kebab skewer or similar piece of soft wood to fit in jack socket.
  • Super Glue
For the next step I used a "Satay Stick", these are square ended wooden skewer/kebab sticks made from a softish bamboo used for Chicken Satay and the like. They are just the right size to fit in the socket hole. Removed the plastic ring to expose the central conductor for the jack, gently press and rotate the Satay stick to make a hole in the centre. Put the tiniest amount of Super Glue into the hole in the stick, dont let it get down the sides of the stick. If it does trim off and have another go. Carfull reinsert the stick into the hole and press for about 10 sec. give another 30 sec to make sure fully stuck and then pull stick straight out. With a bit of luck the result should look like the photo below.


17/07/2013

VLC media player

VLC is a free and open source cross-platform multimedia player and framework that plays most multimedia files as well as DVD, Audio CD, VCD, and various streaming protocols. 

When installing VLC media player it is important to make sure you only download from the main website. Unfortunately VLC media player has become a popular piece of software to bundle with a range of malware and potential malware as I discovered to my cost recently. I managed to corrupt the copy of VLC that I was using and when I tried to reinstall from the original download file I managed to install Spot.do a browser hijacker hiding as a helpful toolbar. There were also other nasties that loaded at the same time. I don't remember where that original download came from but it reinforced the cautionary warning to be careful where you download freeware from even something as popular as VLC media player.Incidentally I managed to clear up the problem using Malwarebytes.

Hence the reason for this post to guide you to the original source download. which can be found here:-

http://get.videolan.org/vlc/2.0.7/win32/vlc-2.0.7-win32.zip


20/05/2013

Canon Powershot G12 Lens Error Fix

I took my Canon Powershot G12 out of my bag, I turned the camera on the lens partially extended but would not focus, zoom or retract when turned off. On the screen it displayed Lens Error.I had not dropped or banged the camera and it had been working immediately prior to putting in the bag.

I just found a fix. Hold down the shutter release, then turn the camera on. The lens retracted and Bingo now works normally. This fix may work for other camera in the G range.

The last time that happened on a G9 it cost £250 to repair via insurance.

11/03/2013

How to Copy a List of Files from a Windows Folder Into an Excel List

Maintaining an Excel spreadsheet of computer files can help you keep track of important business documents or images. Unfortunately, Microsoft Excel doesn't include a one-step method for importing a file list from Windows Explorer, but Windows 7 offers an easy workaround. Using the Command Prompt, you can tell Windows to output a text document containing a directory list. This text document can then be imported into Excel and modified just like any other spreadsheet.
Link back to original post...

Step 1

Press "Win-E" to open Windows Explorer and locate the folder for which you need a file list.

Step 2

Hold the "Shift" key, right-click the folder and select "Open Command Window Here." This only works with folders, not libraries. Libraries point to a specific folder, so select the folder located under the library icon. If the library points to a drive, right-click the drive letter from the folder tree.

Step 3

Type "dir /b > dirlist.txt" without quotes and press "Enter." This creates a list containing file names only. To include file sizes and dates, type "dir > dirlist.txt" instead. To also include files in sub-directories, type "dir /b /s > dirlist.txt" to create a list of files with the full directory structure name, such as "C:\folder\subdirectory\file.txt."

Step 4

Open Microsoft Excel and press "Ctrl-O" to bring up the Open dialog window.

Step 5

Navigate into the folder containing the files [note: this is the folder you right clicked on]. Click the file type drop-down menu and select "Text Files (*.prn,*.txt,*.cvs)." Double-click "dirlist.txt" to open it.

Step 6

Click "Finish" in the Text Import Wizard window to use the default options and import the directory list into Excel.

The dirlist.txt file created by his method could also be opened into Word or any text editor.

10/03/2013

Remove Moire Pattern from Scanned Image

Photographs scanned from books, magazines and newspapers or photographs from TV screen or projected images often results in an unsightly interference pattern called moire. This is how to remove the effect in Photoshop.
  1. Go to Filter > Noise > Median.
  2. Use a radius between 1-3. Typically the higher the quality of the source, the lower the radius can be. Use your own judgement, but you will probably find that 3 works well for newspapers, 2 for magazines, and 1 for books.
  3. Go to Image > Image Size  and resample to the desired image size and resolution using the bicubic resampling option.
  4. Make sure you are zoomed to 100% magnification.
  5. Go to Filter > Sharpen > Unsharp Mask.
  6. Exact settings will depend on the image resolution, but these settings are a good starting point: Amount 50-100%, Radius 1-3 pixels, Threshold 1-5. Use your eye as the final judge.

Tips:

  1. If you still see a pattern after applying the Median filter, try a slight gaussian blur before resampling. Apply just enough blur to reduce the pattern.
  2. If you notice halos or glows in the image after using Unsharp Mask, go to Edit > Fade. Use settings: 50% Opacity, Mode Luminosity.

28/02/2013

Word 2010 Spell Check Language Not Correct

I just realised that my spell checker keeps offering American spelling as a correction ie favor instead of favour. The document language was set to English (UK) so why the problem? Apparently you have to set the Proofing language, mine was set to English (US) for some strange reason. 
So here is how you change it...
In Word 2010 select the following options from the Ribbon:
  1. Review tab > Language group > Language button > Set Proofing Language
  2. In the Language dialog, select the language you want to use for spell checking.
In Word 2007, Review tab > Proofing group > Set Language will accomplish the same thing.

Word 2010 Insert Endnote at end of a Section

The menu layout in Word 2010 is so frustrating at times. I wanted to insert Endnotes before my References, so I made a Section Break [Next Page] but the end notes came at the end of the 2nd section, ie after my Reference Section. After much searching I discovered the answer here.

This is the post which provided the answer, I hope you can follow it...
 ... make your changes directly in the Footnote and Endnote dialog, which you can open with the dialog launcher in the bottom right corner of the Footnotes group on the References tab? Select Endnotes, select "End of section," select the desired number format, select Continuous (assuming you're putting them all at the end), and make sure "Whole document" is selected under "Apply to."

Screen Clip - Footnote Endnote Menu
Finding the answer was a problem because Word 2012 does this differently to previous versions of word and many of the answers that come up are for the older versions.

26/02/2013

Picasa not Downloading Video or RAW Files from my Camera

I have been using Picasa for ages now and it is one of my favourite bits of software. I recently started to use it to upload images from my Canon G9 and G12. I have just realised it is not uploading video files nor is it showing RAW files, which it used to do. 

The solution seems to be quite a simple one. I discovered that in Tools> Options> File Type, I did not have the boxes for RAW or Videos checked. Interestingly when you tick the Video box another box appears with the option to select .mov (Quicktime) files as well. I ticked all the relevant boxes and suddenly Picasa is searching all my watched folders for the missing file types, and when I connected my camera it found and downloaded the video files.
Picasa >Tools> Options Screen Snip

16/01/2013

Slow Boot - Optimize Windows 7 for Faster Start-up

No matter how fast or shiny computers might be when they're new, they all seem to get slower over time. My Samsung NC10 netbook running Windows 7 was taking forever to start up so time for a sort out. As a yardstick they reckon if your computer is taking more than 45 secs to boot up there is something seriously wrong, mine was taking nearly 2 minutes. 

A quick Google throws up a bunch of useless information most of which is a disguise for selling you some 3rd party software solution. So I started with the Microsoft suggestions "Optimise Windows 7 for Better Performance".

First suggestion is to try the Performance Troubleshooter, which can automatically find and fix problems.
  •  Open the Performance troubleshooter by clicking the Start button Picture of the Start button, and then clicking Control Panel. In the search box, type troubleshooter, and then click Troubleshooting. Under System and Security, click Check for performance issues.
I discovered that about 10 programmes were opening at start-up. None was essential, Microsoft hides the essential programmes from view, so I chose the global option to close all. I rebooted as requested and amazingly the NC10 booted in 30 seconds which I call a result.

There are other things you can do, if you are not certain about the security status of your computer you may wish to double check you have no nasties lurking about on you HD. Make sure your ant-virus software is up-to-date and run a full scan. If you don't already have it, upload anti-malware software such as Malwarebytes, get the free version here. If you not up to speed with security software I suggest you have a look at this video by Britec09 on YouTube, this guy knows what he is talking about and there are no catches.

01/01/2013

Send to OneNote Printer Option Missing

With Microsoft OneNote installed in Windows 7 there is Print to OneNote option in the Printer List. Occasionally this can go missing. Here is a solution. 

Repair the Microsoft Office program installation

  1. Close all Office programmes.
  2. Click Start, and then click Run.
  3. Copy and then paste (or type) the following command in the Open box, and then press ENTER:
    appwiz.cpl
  4. In the Currently installed programs list, click the installed version of the 2007 Office program, and then click Change.
  5. Click Repair, and then click Continue. 
  6. Restart computer.

30/12/2012

Firefox - Right Click Menu Flickers

I am using Firefox 17.0.1. My second monitor an AOC 1950W was replaced after developing a fault. Immediately I discovered a problem when using Firefox. Right clicking on a web-page resulted in the Right Click Menu flickering and disappearing making it difficult if not impossible to select a menu item. There was no problem on the main display. Using Chrome on this display there was no problem.

I checked settings were correct and that drivers were up-to-date to no avail. A Google search for "firefox right click menu flickers" produced the following suggestion:-
Try to disable hardware acceleration.
  • Tools > Options > Advanced > General > Browsing: "Use hardware acceleration when available" .
If disabling hardware acceleration works then check if there is an update available for your graphics display driver.
Untick box and restart Firefox, this solved the problem.

14/12/2012

Ripping (Backing Up) DVD's and CD's

Due to the minefield of legislation covering the copying of propriety media such as DVD's and CD's one has to tread carefully when offering advice in this area. But given the damage that grand and not so grand kids can wreak on DVD's and the like "Backing Up" is no bad idea. I work on the misguided principle that providing such copies are for my own use and I have no intention of passing them on or off for gain or otherwise I feel my actions are justified or at least defensible. There are also occasions that I wish to send copies of my own work to various places and people as part of my art practice and studies so a "How To" reminder is in order. For those of a nervous disposition you ay want to read about the The Digital Millennium Copyright Act - DMCA!  This information is available via the website Doom9.net the guy who runs this very succinct site about all things "Ripping" obviously knows his subject and conveniently brings all the info together in one place, so that's the place to go for more info.


As I "Back Up" DVD's and CD's so infrequently I can never remember what I did last time I did it so I decided on a Blog Post to remind me.

I have tried DVD Decrypter and DVD Shrink, they both seem to do the ripping just fine. If you have problems with encryption or copyright protection then DVD Decrypter is probably the best choice. You can find Guides on how to use this software on Doom9.

The Death of Microsoft Live Mesh

Re Blogged from ghacks.net
Anyone here still using Windows Live Mesh? The service allowed you to synchronize data between multiple PCs years before Microsoft made the switch to SkyDrive as its main synchronization and data hosting service. Microsoft today announced that Windows Live Mesh will be discontinued on February 13, 2013 as a consequence of that shift towards SkyDrive. Part of what made Windows Live Mesh great on Windows and Mac OS X has already been worked into SkyDrive, Microsoft calls that the DNA of Mesh that has been brought over.

04/12/2012

How to Open PNG Images in Picasa

Picasa doesn’t automatically include Portable Network Graphics (PNG) images by default. You can however view PNG images in your Picasa photo library and open them in Picasa for editing from the Picasa Photo Viewer application. You can also set PNG images to always open in Picasa Photo Viewer. It just needs a change to the <Preferences>.

How to Open PNG Images in Picasa
  1. Open Picasa.
  2. Click the Tools menu in Picasa and select Options.
  3. Click the File Types tab at the top of the Options window.
  4. Enable PNG image support by clicking the PNG check box and clicking “OK.”
  5. Click the Tools menu and select Configure Photo Viewer.
  6. Click the PNG check box in the Photo Viewer Configuration window to open all PNGs in the Picasa Photo Viewer by default, if desired, and click “OK.”
If Picasa does not update missing PNG files automatically, add PNG files to your Picasa library by clicking the File menu and selecting Add File to Picasa or Add Folder to Picasa. Picasa also automatically adds to your library PNG images in folders it’s already watching.

Adapted from a post on eHow.com

18/10/2012

Microsoft Wireless Mouse 5000 Scroll Problem


I recently installed a new keyboard and mouse, a Microsoft Wireless 5000. The first thing I noticed was the scroll wheel on the mouse seemed to have a mind of its own. But most annoying was that the scroll wheel did not work at all with some programmes, namely Picasa, a programme I use quite frequently. After fiddling with the settings I still could not solve the problem. There were lots of posts on the net about this problem but no solutions. I eventually came across the suggestion of changing the mouse to a different type in the configuration. I chose "Standard Wireless Optical Mouse", see the screen grab below. hen go to the "Wheel Button" drop down menu and choose auto-scroll. The mouse and scroll button now works perfectly with Picasa.


28/06/2012

Read It Later - Firefox Add-On to Save Web Page to Read Later

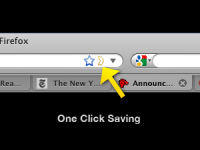
I use Firefox browser and invariably have loads of tabs open for pages I intend to read later or just that I just want to remember. The important ones I tag with Delicious but for the rest I usually end up closing them down and then inevitably as soon as I do that I need to look at one. Firefox has an Add-On called Read-It-Later also available as an iPhone and Android App as Pocket. With this Add-On you can save web pages to read later with just one click, the icon appears in the URL dialogue as yellow outline chevron.
When you have time, access your reading list from any computer or phone, even without an internet connection!

You can find the Add-On in the Firefox menu >Tools >Add-Ons (Ctrl-Shift-A)

I will report back when I find out if it helps with my problem.

01/05/2012

iDevice Hell

I started with and iPod Touch then the iPhone arrived and now I have an iPad. Whilst I love the user interface of these products I hate iTunes. I never really got to grips with it when I had the iPod, now I have the other 2 pieces of kit I am totally confused. Why does it have to be so difficult to manage the devices and my PC and my Netbook. I have never been the same since I zapped everything from my iPod just when I thought I had it cracked, my confidence has been shattered.

04/04/2012

Dell Monitor Power Button Failure


The power (on/off) button on my Dell 2407 WFP-HC monitor failed, fortunately in the ON position. Despite the monitor being about 8 years old it works perfectly well and I had no intentions of trashing it, so was it fixable? Lo and behold first Google search result was a YouTube video, in 4 parts, of how to repair the power button on a Dell 2407 WFP monitor by thinkofwhy.

I would advise watching all 4 videos before starting. Watch out where he mentions removing the stand and rear cover in part 4.  Removing the rear cover will make the removal of the circuit board that holds the switches much easier and its replacement. It is important to replace the button in the correct orientation, that is with the line vertical. Before I got to dismantling my monitor I discovered that if I used a blob of Blue Tack pressed on the button and turned the button to the correct orientation I could operate the button.

The problem is if your button fails in the OFF position you will not be able to watch these videos.  From the number of comments on the video's this is a common problem with this and other Dell monitors so even if yours is working ok check these instructions out before it is too late.

Part 1       
Part 2
Part 3
Part 4